Wiki:
Page name: Some Sculpting Basics [Exported view] [RSS]
2007-01-02 20:51:39
Last author: Hedda
Owner: smakeupfx
# of watchers: 14
D20: 7
Bookmark and Share
Hi all, [smakeupfx] here, 
I get asked fairly often about simple instructions for making small figure sculptures, or Maquettes.  Molds and mold making techniques, and random questions on materials and tricks.  I'll keep adding to this page as I think of things or in answering your questions.

Maquettes are one of my favorite kinds of jobs. It's all fun and no molds or multiple fabrication. That stuff gets to seem an awful lot like work ;-) They are often small figure sculptures made as one of a kind art, character design "sketches" or a starting point for CG modeling.

What you will need
Polymer Clay - I use SuperSculpy, but fimo, sculpy or any other brand will work and each has it's pros and cons.

Epoxy putty - you can pick this up at almost any hardware store. It's a two part clay-like putty that will cure in 5 to 15 minutes when mixed together.  You can also use more professional materials like Magic-Sculpt, it's a very strong epoxy putty that has a working time of 5 or so hours and fully cures in 24 hours (less if you heat it a bit ;-)  Pick up some 5-minute epoxy glue too, it's useful in putting things together later.

Aluminum armature wire - I use several different sizes of this, but you have to have it. Copper wire or clothes hanger wire will work in a pinch. It's just harder to adjust the pose and bend.

Sculpting tools - Your hands are the best tools you have, and you can make your own sculpting tools pretty easily or just use whatever you can find (I still do). Cheap sculpting tools work just as well as expensive ones, I often get some of those little plastic kids paint brushes and heat one end with a lighter and shape it while hot when I need a special tool for something.

Step by step
First, get your idea sketched out 1 to 1 flat out on a piece of paper. Use that as a template for constructing the wire frame armature. Lay the wire on the paper and bend it until it centers the form you will be sculpting. This step really saves a lot of time and material. It's hard to get arms and legs proportioned right in wire frame without a guide since you're centering the wire in the form not re-creating the form... if that makes any sense. I also like to make the head so it can come off. pretty easy to do, just wrap some wire around the neck stalk so the head piece will slide in and out. Then you can focus on the head and when you get it just right, cook it so you can't bump it and mess up hours of work. For thicker pieces, twist two wires (or more) together, helps it not break as easily and the clay and putty sticks better.


Here is a piece I did from start to finish. The armature is bent from wire and that is glued down to a piece of wood with 5 minute epoxy. For bigger shapes, you can wrap the wire with some aluminum foil to fill it out and save you money and clay.

<img:stuff/armature%201.jpg>


Next, mix up the epoxy putty and cover the wire with a thin coat. Make sure you leave room for clay on top of this (you can cut the epoxy away later if this happens in a place or two, no big deal really).

<img:stuff/epoxy%20cover.jpg>


When the epoxy sets, you can start. I use SuperSculpy. If it's fresh (not sitting on the store shelf for years) you can just start adding. If it is crumbly, you can add a few drops of Mineral Oil and mix it up until it's the right consistency. Just start adding clay, getting the shape roughed out.


<img:stuff/with%20clay.jpg>
<img:stuff/bulked%20up.jpg>


I like to get things roughed out, all the proportions the way I want them, then start finishing the most detailed parts, like the head, separately. When I get them just the way I want them I cook it. You cook sculpt in your home oven, follow the directions on the clay and watch it closely, if it starts to turn purple turn it off! don't over cook polymer clays, they put off toxic fumes then.


<img:stuff/face%20done.jpg>


You can add more clay on top of clay already cooked, then sand or cut or carve...cook again, add more clay. It's a great way to work, and lets you keep adding details without messing up the ones you already finished.


<img:stuff/finished%20body.jpg>


When it's all done, give it a coat of Krylon Primer Paint (really it's the best...worth it to find, cheap stuff will clump, drip, come out of the can with a bad texture, or any number of BAD things when you're put in 60 hours on a sculpt. (and it's really not much cheaper). If Krylon isn't available where you live, ask at a paint store for the best primer paint they carry.

<img:stuff/primed.jpg>

Once primed you can paint with anything. I often use acrylics, with washes made from acrylics mixed with alcohol, and then maybe some oil paints (they are great for gradations and the like.

<img:stuff/hamishfinish.jpg>


There ya go man, hope that helps. If you have any questions or problems, I'd be happy to help if I can.  Have fun and make some stuff!

Username (or number or email):

Password:

2006-11-30 [smakeupfx]: damn, I compleatly forgot about that... I'll transfer the images over here...sorry everyone... I'll get the pics up soon

2007-01-02 [Hedda]: I downloaded the images to Elftown now.

2007-01-03 [Trennas]: weeeeh, its working again ^^

2007-01-04 [smakeupfx]: Awww, Thanks Hedda!  I have been procrastinating finding a hosting webpage... like I do ;-)

2007-01-04 [Trennas]: that is a shitty thing to look for yes.. those that are free have either lots of banners and popups or are really slow XD

2007-01-04 [smakeupfx]: yes... me get all confussed and ..... stuff ;-)

2007-01-05 [Trennas]: tell me about it.. i have been nothing but websites for the past two weeks XD

2007-01-05 [smakeupfx]: nothing?  poor Saray ;-P

2007-01-05 [Trennas]: oow and Saray ^^

2007-01-06 [Jewl]: teehee

2008-08-03 [Sir. Robert]: I was inspired to go out and try this :P I always had problems sculpting with air dry modeling clay because it dried too fast, and my recent endeavors with foam, fiberglass, and epoxy were fun, but not very practical in such a small scale, but they are nothing compared to this Polymer clay! If the whole baking in the oven thing goes well, SuperSculpy will be my new best friend :)

2008-08-04 [smakeupfx]: it should be :-)  and don't forget.. you can add more, sand, carve.. add more, cook again, it's perfect for refining :-)

2008-08-04 [Sir. Robert]: I was really stubborn about that and wanted to just bake it once...that was before I dropped it on the floor and magically erased most of my hours of work...now I cook it once about every 4 hours to "save" what I have done :P

2008-08-06 [smakeupfx]: Hahaha, now if they can come up with a clay that has "undo" ;-)

2008-08-06 [Sir. Robert]: ...that is why I a in love with my new drawing tablet because the undo button is so much more efficient than an eraser :P

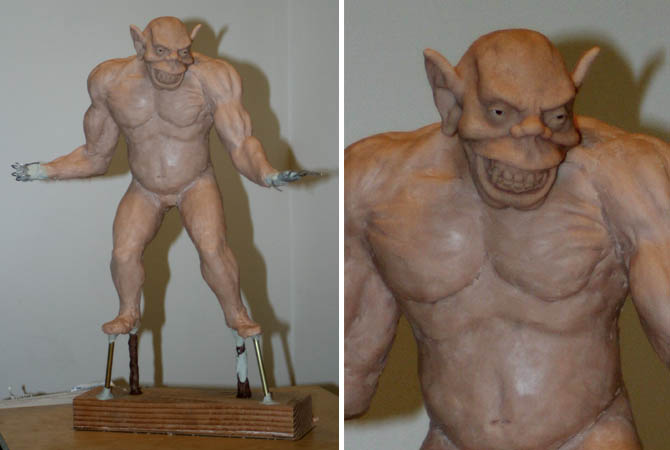
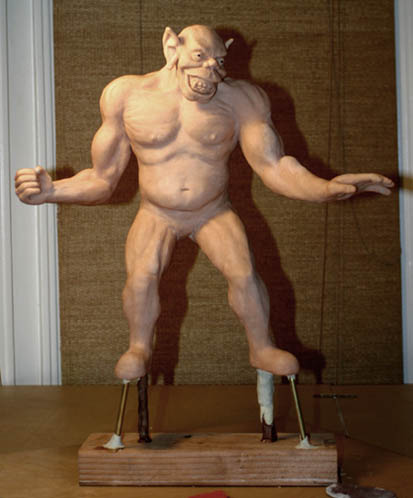
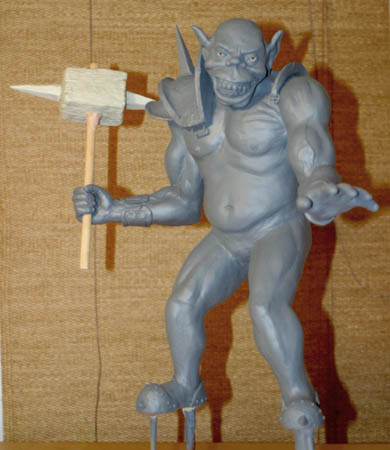
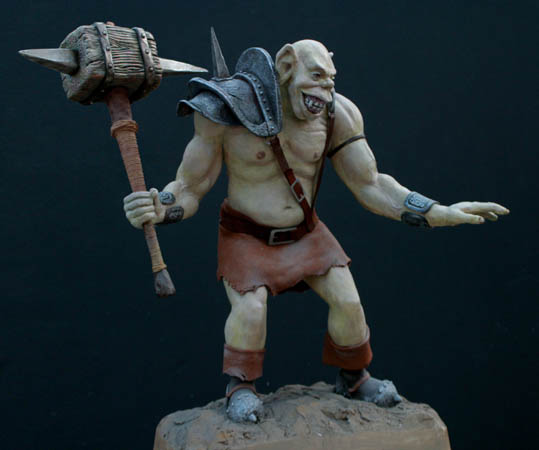
A few things I learned so far:

Take your time and Don't skip steps...I got too excited and forgot to cover the aluminum foil with a layer of the epoxy putty which made applying the SuperSculpy harder and continued to cause problems until the first time I cooked it...

Things that can not handle the heat of the oven should not go in with your project...I forgot to remove tape from the bottom of the base, and the objects I used as the eyes couldn't take the heat of the oven and smell really bad when baked

If spending a few more dollars saves you time or gives a better result it is worth it...I bought cheap reasonably heavy gauge steel wire which saved me a few dollars but I ended up wasting a lot of my time making it the way I wanted it :S

2008-08-06 [smakeupfx]: That.. and buy low... sell high, always good advice ;-)

2008-11-27 [Saray]: The first sculpture I want to make when you're gonna teach me, is a really hot mermaid, so I can give it to you because I never finished that painting years ago!!! :D

2009-05-30 [Sir. Robert]: I am really having trouble smoothing out finger prints and tool marks on my project. Is there a good way to get rid of those before baking them in so I don't have to sand for as many hours?

2009-06-08 [smakeupfx]: yes, use a brush just barely dampened with water for water based clay, alcohol for oil and mineral oil for polymer clays... it's like very fine sand paper and you can brush much of your work lines away ( I have a collection of various sized and stiffnesses that I only use for sculpting)  Sometimes it helps to cut the bristles short on a few of them too.  hope that helps Robert :D

2009-06-09 [Sir. Robert]: I guess I will lube up my project and see if it smooths out, and I have plenty of different brushes to try out from my painting projects. Thank you!

2009-09-30 [Sir. Robert]: I feel like I am spamming this wiki with questions, but you always seem to have a good answer, and my normal source of information (google) seems oblivious on the topic:

I left out a project in the open air for around 2 months, and it seems to have "dried out." This is ok since most of the details which are now set in stone are to my liking. Can I still bake the dried SuperSculpey, or will it crack or something worse?

Number of comments: 248
Older comments: (Last 200)

200 older comments
(0, 0-13):

Show these comments on your site

Elftown - Wiki, forums, community and friendship.