Wiki:
Page name: jewel tutorial [Exported view] [RSS]
2004-08-28 21:42:27
Last author: liiga
Owner: liiga
# of watchers: 4
Fans: 0
D20: 12
Bookmark and Share

Jewel tutorial

by [liiga]

This is a tiny tutorial to illustrate how I draw jewels. The principle is very similar to the one used in eye tutorial. This tutorial uses Ulead Photoimpact 8 and Corel Painter 8 - mind you, Photoimpact can be left out, because I only used it for the case surrounding the gem itself. Painter can be replaced by any program as well - even MSPaint, if you've the patience it takes. :P

<img:stuff/jeweltut.jpg>

Here's how it's done.

1) The case is drawn using vectors in Ulead Photoimpact. (See chain tutorial for more detailed explanation on how to do that.) It is saved in a .psd file, and opened in Painter.

2) Zoom blur ('Effects' -> 'Focus' -> 'Zoom blur') is applied set at 0%. That softens the hard pixelated edges that vectors tend to occasionally produce in Photoimpact.

3) Motion blur ('Effects' -> 'Focus' -> 'Motion blur') is applied, with radius set at 1.00, thinness set at 1%, angle set at 174°. Angle was chosen by experimenting and seeing what fits best.

4) Saturation ('Effects' -> 'Tonal control' -> 'Adjust color') is increased by something around 20% to bring out the color a bit.

5) Now it gets more interesting. Create a new layer, and color it with a brush so that it covers the area inside the case entirely and also goes a bit outside it - make sure it doesn't go outside the outer edges of the case though. Now, apply a layer mask ('Layers' -> 'Create layer mask from transparency') to make sure that it stays exactly that big. Now, put that layer behind the layer on which the case is.

6) Pick a lightsource. In this case, the lightsource is that round thingy with an artistic improvisation of rays around it. I drew a line through the lightsource and the centre of the jewel to illustrate how the location of reflections is determined. Of course, that's on a separate layer. XD

Now, go against the common sense - don't put highlight where the light from the lightsource hits the surface of the jewel. Instead, put a highlight where it would hit the Inside of it! In this case, it's the bottom part of the jewel. The top part gets some shading to bring out the highlights and to account for the shadow that is cast by the jewel's case.

Important: Don't even think of shading with dodge/burn here. Don't even shade with lighter/darker hues of the same exact color! Here I imagined the light would be warm (in most cases it will be warm) and added some yellows to the highlights and some cooler greens to the shadows, and some warmer greens at the very edge of the shadow to add some extra punch. If you had light of cool color, the highlights would get blues added to them, etc.

7) Now add the reflection on the surface of the gem. It is located on the line that is drawn through the lightsource, the centre of the jewel and also the inner reflection. What happens is, that the light first hits the surface of the jewel (that's the reflection we're adding now), then goes through it (provided it's at least somewhat transparent jewel, of course!) and creates that inner reflection. Therefore, the reflection on the outside will usually be stronger and more focused. Just How sharp you make it depends on how smooth the jewel's surface will appear. In this case I went for a less smooth surface (or a lightsource of very strange shape), and made a reflection with relatively soft edges.

8) This step is optional, you might not want to tinker any further. If you look carefully at the edges of the jewel, I added small reflections from the case. At the bottom where the case is very light, I added a small edge of light on the surface of the jewel, and at the top I added a small dark edge. Likewise, I added a few tiny greenish reflections on the case itself, that are also located on the line drawn through the reflections and the lightsource. This step is basically meant for integrating the two parts of the drawing a bit more.

Well that's about it! Apply the layer masks (so you don't have spare masks hanging around and taking up disk space).

Oh yes, a note: all shading was done with actual colors, and no grayscale was used. Even the surface reflection uses very pale blue, yellow and red colors. White and black (and gray) flatten the image, so avoid them when possible.

<img:http://www.pro-counter.com/cgi-bin/gd-count.cgi?page=jewel tutorial&style=white_rabbit_green&nbdigits=8&reloads=1" alt="Mesothelioma Lawsuit">

Back to Tutorials

Username (or number or email):

Password:

2004-11-11 [Dil*]: ...i never use ms paint though :P

2004-11-11 [Tyrana]: I didn't use it until just recently. My dad put together a glorified word-processor to put upstairs for my brother and I to do homework, and it won't accept any art programs ^_^... I've been fiddling around with paint a bit... And I've decided that Photoshop pretty much completely dominates everything.

2004-11-11 [Dil*]: yep, except corel painter 8...

2004-11-11 [Tyrana]: I've never tried that, actually... And I guess I've been using ImageReady... but it's esentially the same as Photoshop. I dunno... I'll hafta kife corel painter from someone ^_^

2004-11-11 [Dil*]: corel painter is brilliant.

2004-11-11 [Dulce Vita]: Hey, [Tyrana], you might want to look into getting an older, stable, version of GIMP. Some versions of it will run under Win 95, I think.

2004-11-11 [liiga]: Ulead Photoimpact 6 runs under Win95, even with 32 Mb RAM - that's the configuration I ran it under with my old compy. It's less resource hogging than Photoshop, can do pretty sweet bitmap editing and has very nice vector capabilities that are at the same time very intuitive to use. ^^

2004-11-11 [Tyrana]: Hey! Thank you guys! ^_^... I'm going to look into those. My mom, actually, is the artist-person in my family. I'm not real great at it *revels in her musicness*... especially compared to her, wow... But yes, thank you for the suggestions. My mom's all excited now ^_^... She thinks photoshop is too complicated...

2004-11-11 [Dulce Vita]: If you get a tutorial to go with PS, you can do a lot. Also, you may want to try Paint Shop Pro, but not on that computer.

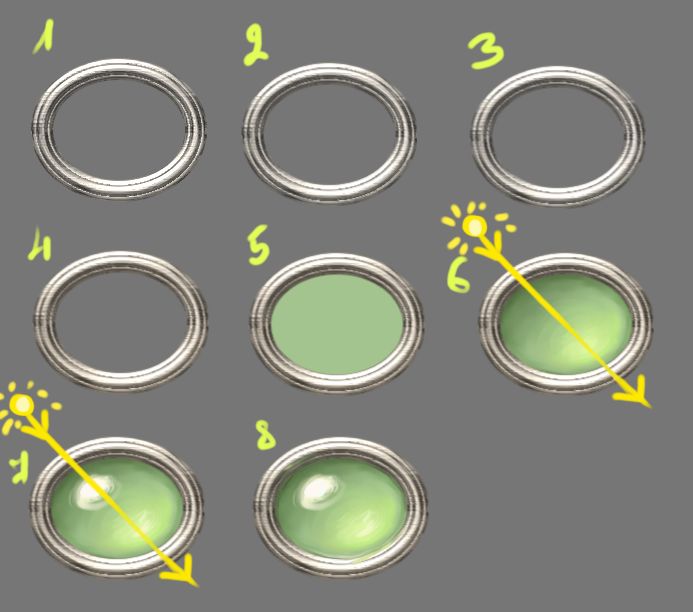
2005-06-27 [Zab]: hello! nice water-jewel up there! ::points::

2005-06-28 [Tyrana]: Hi! Why, thank you very much! Those are damn good instructions, methinks, if I can pull off a jewel in MS paint *nods*

2005-06-28 [Zab]: yeah..Paint have it´s ...let´s call them 'limits'.. XP

2005-07-01 [liiga]: I still think it should be called MS Pain. ;P

2005-07-01 [Zab]: ::grin:: yeah...but at leasty I know how to work it....Adobe is totaly...err... not made to be learnt how to do in it...Oo

2005-07-02 [Dil*]: MS Pain?! hahaha

2005-07-02 [liiga]: Yeah, Photoshop IS a mystery. Too many shortcuts for my liking. ;p But Ulead Photoimpact and Corel Painter are much more straightforward, so I love them. ^^

2005-07-02 [Zab]: Never seen them..err..well, I have ps and need to learn it...

2005-07-02 [liiga]: You should take a look at least at Painter - a note, it's best with a tablet - then you can make good use of the pressure sensitivity. It's harder to work with the mouse.

2005-07-02 [Zab]: I know..::shrugs:: I just don´t want to lay any money on computer programs, and I guess it cost a lot?

2005-07-02 [liiga]: *whistles* all depends on where you get it from. there is such thing as discounts for students, among *other* things.

2005-07-02 [Zab]: ::lol:: got a few (incl. adobe PS 7.0) for free from eh...<<...>>.. I´m going now, I´ll go out and ride.

Number of comments: 33
Older comments: (Last 200) 1 .0.

Show these comments on your site

Elftown - Wiki, forums, community and friendship.