Cel Shading in Photoshop
A tutorial by: [Falx]
Ok, so I’m going to try to take you step by step through what I do. Some of it might seem a little weird, so if you have any questions as to why I’ve done certain things the way I have, feel free to ask.
1. Scan in your picture: File>Import> (here you should have a list of things like PDF image, WIA support, etc… Your scanner should be listed there.) Click on your scanner name. Scan the picture. It should open automatically in Photoshop.
2. Layer>New>Layer. Click OK.
3. Off to the right you should see a window with a tab that says Layers on it. Click on Layer 1 (your new layer). In the window there should be a drop down menu that says normal at the moment. Open the drop down menu and select SCREEN.
4. There should be a tab window in the top right corner with a tab that says COLOR on it. Click on the foreground color. Change it to a light blue. I suggest the values R=56, G=201, B=232.
5. Use your paint bucket to fill the new layer with this color. It should turn all your line work light blue.
6. Layer>Flatten Image
7. File>Save (Save as a JPEG file)
8. File>Print with preview. In the preview window, make sure you print the picture at the largest size you can and still have it fit on the paper. Also make sure that the height and width ratios are locked. If you see a little thing between them that looks like a chain, then they are locked.
9. Now, trace over your blue lines with a good inking pen. I prefer not to use ballpoints as they tend to leave a lot of gaps on the second scan. I recommend Uni-ball roller ball 0.2mm black pens. They give a really nice, smooth line.
10. Ok, follow step one again, only this time make sure you set the scanner to scan in PURE BLACK AND WHITE.
11. Image>Mode>Greyscale. Click OK
12. Image>Mode>RGB Color
13. Grab the magic wand tool. Select the area outside of what you want to color. Make sure you get all the space around the drawing. You may need to use the Add To Selection button on the top toolbar to get it all.
14. Hold down Ctrl+Shift+I This will select your drawing.
15. Hold down Ctrl+V to paste the drawing into a new layer. You now have layer 1 and Background.
16. Use the eraser tool to erase any lines leftover on your Background layer. I usually use the biggest eraser I can for this just to make sure I don’t leave any digital crumbs behind.
17. Ok, Layer 1 (Line Layer). Use the magic wand set on Add To Selection and select all the white space on the drawing. Hit the Delete key.
18. Layer>New>Layer. Click OK
19. Go over to your Layers window. Click on Layer 2 (this will be your Flat Colors Layer) and drag it and drop it between Layer 1 and the Background.
Ok, Time to color this bad boy. ^_^ (Finally, ne?) You can do this either with the paintbrush or with the bucket. I usually use the bucket. It’s a little faster and works just as well.
1. Use the magic wand to select the section you want to color in Layer 1.
2. Use the paintbrush or the bucket to fill in the color on LAYER 2.
3. Do this until you have filled in all the colors (duh. Right?)
Easy enough, yeah? Shadow time. You want to add in a new layer (Layer 3 or Shadow Layer). Click, drag, and drop it between your Line Layer (layer 1) and your Flat Colors Layer (layer 2). Make sure that the Shadow Layer is under the Line Layer, but on top of the Flat Colors Layer.
1. Set the color on layer 3 to pure blue (R=0, G=0, B=250) and 80% Black (K=80%)
2. On your Layers window, set the opacity to about 30% (Lower if you want lighter shadows, higher if you want darker, but not at 100% because it will look REALLY dorky)
3. Ok, take out the magic wand and select the area(s) you want to work on from Layer 2.
4. Use the Paintbrush to draw in your shadows on LAYER 3. (I think this is the most tedious part of the coloring process.) I usually set the layer view to 100% or higher to get nice, clean shadows because I find it easier to work a small section at a time.
5. A note on shadows: Clothes tend to just be triangles as a general rule, and if it sticks out in any way, there’s probably a shadow underneath of it. Also, you can do nifty little hair shines this same way, just use white instead of the dark blue.
Last bit. When you’re done with your shadows, click on the background layer to select it. Add in a background. I’m usually pretty much a slack monkey on backgrounds. I usually just do a nice gradient fill or a pattern fill. Largely because by this point I don’t want to put out the effort to do a real BG -_-;
Then:
Layer>Flatten Image
Image>Image size… A window will pop up here and you can shrink down your picture so it will fit on Elftown. Make sure that your pixels are locked like on the print preview or you’ll get distortion. I recommend a width of 300 pixels. It makes the resolution on the pictures come out really nice.
File>Save Save this as a JPEG file on highest resolution. This will make it come out really nice on Elftown.
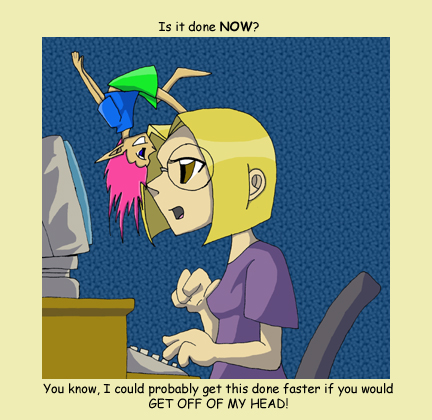
Here's a nice example of an end result:
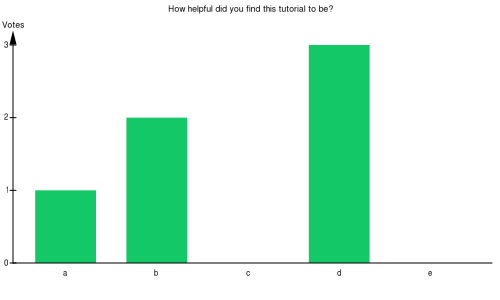
Please fill out the poll when you are done.
1230) How helpful did you find this tutorial to be? (Administrator: [Falx])
Number of voters: 6
* a) Not at all helpful
Number of votes: 1 (17%)
* b) Somewhat helpful
Number of votes: 2 (33%)
* c) Very helpful
Number of votes: 0 (0%)
* d) Monkeys!
Number of votes: 3 (50%)
* e) Meh.
Number of votes: 0 (0%)
 Stumble!