Chain tutorial
by [
liiga]
Alright, here's a quick and dirty tutorial on how I go about drawing chains. It utilises two programs - Ulead Photoimpact 8 and Corel Painter 8. Could do with Photoimpact alone, but since I usually paint the rest of the picture in Painter anyways... You get the idea. Photoimpact could probably be replaced by any decent vector editor, but you'll have to take care of your own metal texture then. ;)
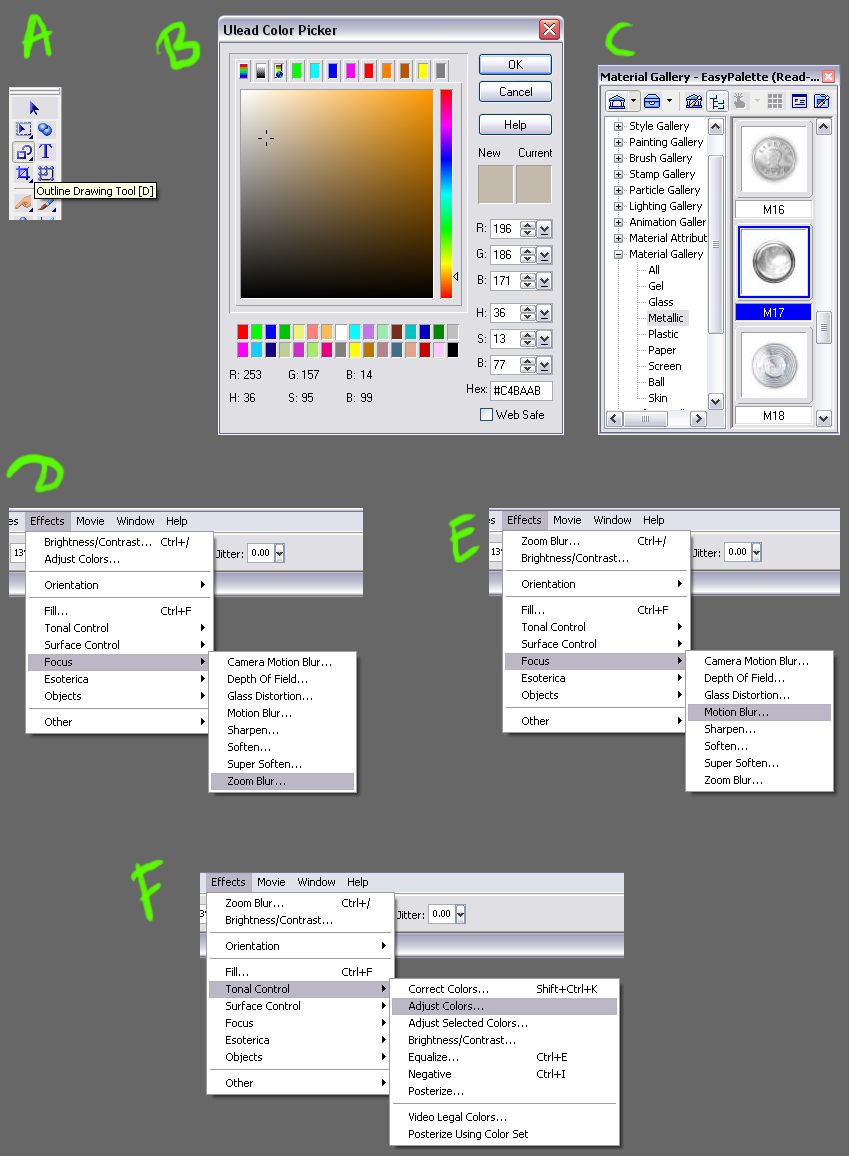
At the end of the tutorial, there's an image with screenshots of the tools I used, just in case you're new to either of the programs. It's 129 Kb, so may take a few moments to load, depending on your connection speed.
Alright, here's what happens.
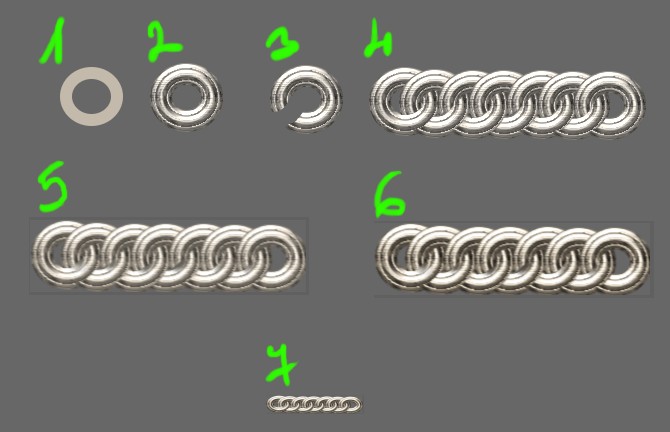
1) I fill the background with some grayish color so that there's a midtone for reference. Using the outline vector tool (see A), I draw a circle. I set the color for the circle to #C4BAAB (see B) - it is close to gray, but not fully gray. It's important because then I will be able to adjust hue/saturation with the built-in tools easier than if the shape were completely gray. (Just believe me on that one. :P)
2) I select a metallic material from the easy palette that I like. Of course you can go and tweak it beyond recognition, I just like this one. ^^ Adjust the color to #C4BAAB in case it has shifted.
3) and 4) Duplicate the circle so that you have a bunch of them, and arrange them in a shape that you would like your chain to take. I just went for a straight segment here. Now, convert all the circles into objects. (Can be done faster if you select them all, click on 'Format -> Hue & Saturation', don't change anything, and just click 'OK'. That automatically converts all paths into objects.) Take an eraser and erase segments of circles (like in 3)) so that they appear to overlap in places to get the look in 4).
Alright, that's enough for Photoimpact. Merge the chains as single object, save the file as .psd, close it. Open it in Painter.
5) I decided the Ulead version looked too sharp - especially since the rest of my pictures tend to be a bit more painterly with a few exceptions - and attacked these chains with 'Zoom blur' (see D) and 'Motion blue' (see E). In zoom blur, I set the blur at 0% - it would seem that it doesn't do anything, but it isn't so. Motion blur I set at minimum thinness, and small radius - something around 1.30. Angle doesn't matter much at such small radius.
6) Went to 'Adjust colors' (see F) and upped the saturation a bit to give the metal more color. Then adjusted saturation and brightness, 'cause I figured that for such a large chain, more saturation was in order.
7) Small chains look more chainy. Yup.
Aaand that's all, folks!

Back to
Tutorials Stumble!