Facial Structures
This tutorial was written, developed and published by [
Farewell]
In this tutorial we're going to cover some really basic steps to drawing a human-like head. Even though this is pretty straight forward, to add a slight amount of mood we will be veiwing our character as if we're looking down at it slightly. Things to be covered are proportions, lines of symetry, basic layout, etc. So let's get drawing!
Step 1
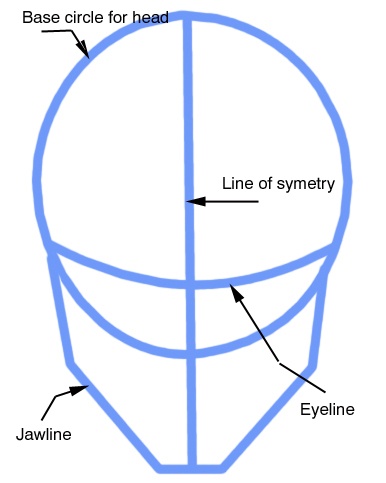
Start out by lightly drawing the base circle for your characters (or persons) head. This should define their shape overal size and proportion. (Keep in mind that in comics, characters overall sizes are generally measured by how many heads tall they are.)
Next we can draw in the basic shape of our characters jawline.
Now we can draw what is called a "Line of Symetry". This is the vertical line that divides the face completely in half.
Then you draw the line that decides where your characters eyes will fall.
Starting to look like a head. Well maybe a manaquin but still.
 Step 2
Ok, here we have something else I usually add that helps me keep my character faces more proportionate. Not all artists use this step, but I certainly find it very useful.
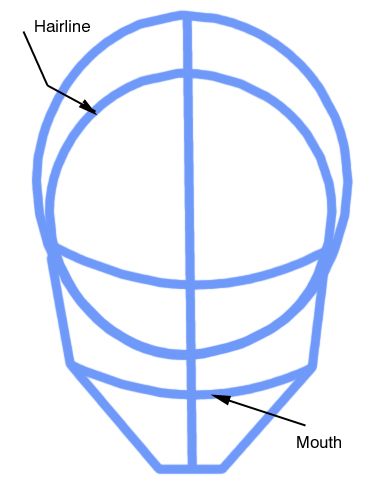
Here I have added another arch to represent the hairline or top of the forehead. Notice how when we add this arch it makes a nice circle in the face.
This circle is what will define all our details such as where the point of our nose will fall, where the cheekbones will land, as well as that hairline and a few other things.
The last arch I make is the one that shows where the characters mouth is going to be.
Remember to draw lightly as alot of these guidlines are going to be erased.

Notice how the face is now dived neatly into 3 obvious sections. The forehead to eyeline section, the eyes to nose section, and mouth to chin. If any one section seems too big or small it should be pretty blatant at this point and should be corrected now unless thats what you're going for, for that character.
On to
Facial Structures 2
Back to
Tutorials Stumble!
