Page name:
Lighting magic - part four [Logged in view]
[RSS] 2005-07-18 21:57:27
|
# of watchers: 1
|
Fans: 0
| D20: 14 |
Back to
Lighting Magic: The Dolphin
Back to
Lighting magic - part three
On to
Lighting magic - part five
4. Body
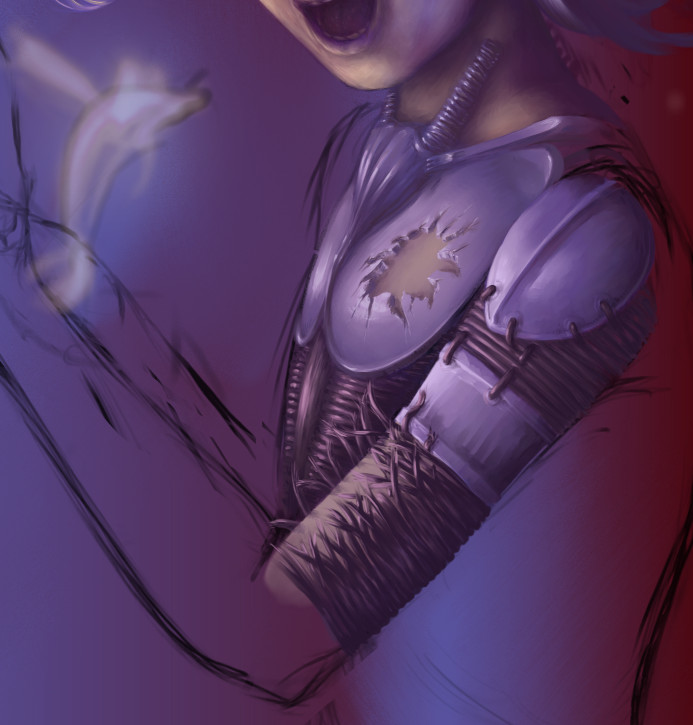
After doing the hair, tackling the body was quite a relief, even though it did involve its fair share of mind-numbing texturing. In the accompanying image you can see that the dolphin has been blocked in on its very own layer. The purpose of this is to serve as a reminder about this lightsource and its desirable color. The body has two distinct materials to it – the wires and the plates. The plates are something between metal and plastic – I wanted them to have somewhat metallic sheen, but at the same time I didn’t want them to be just too shiny, nor to appear heavy. Since we know that metal tends to be heavy and plastic tends to be light and kids generally aren’t built to carry huge armors, I figured there was no reason not to go with this particular amalgam of materials. Pay attention that even though the material itself isn’t very colorful, the actual hues vary throughout the shadows and highlights. These little variations are very handy in making objects appear like they have volume, and thankfully it is quite easy to preserve these variations with the ‘Grainy Water’ blender, which can be a problem with certain other blending tools. The plates were shaded very similarly to the face in the sense that the background was left in as the main color, with shadows and highlights added on top of that (as opposed to first blocking in a base color for each shape). The sneakiest part in this was probably the hole in the breastplate. I first drew the outline of the hole, and then carefully erased it. Then I slapped a layer underneath and painted something resembling a flesh tone on it. After that, I added and shaded the edges to add thickness. I didn’t spend much time tinkering with the inside of the hole as I was planning to do some lighting effects in that area, and didn’t want to have to rework it too much.
As for the wires, they’re a story of their own. At first I tried to look for a shortcut of some sort to painting them, only to discover that the shortest way was doing it manually. The wires on the chest were done on a different layer than the ones on the arm, to save worries about messing one up while working on the other. The wires, too, have highlights and shadows with varying hue, with the highlights being of the warmer color. For the arm, I made one layer with the wires going around it, and another with the loose ends. It wasn’t absolutely necessary, but it definitely did make it more manageable, particularly near the top of the lower section, where loose ends overlap the wires still intact. Since the dark part of the wires was very dark indeed, I added the same light blue ambient light that appears on the child’s face, lower jaw. The flesh color on the arm was on a separate layer just like the spot under the breastplate so that I could adjust the contrast and color of it without much trouble. I also painted some cast shadows from the wires on the arm.
Back to
Lighting Magic: The Dolphin
Back to
Lighting magic - part three
On to
Lighting magic - part five
| Show these comments on your site |
 Stumble!