Wings
Kara's Luna Fairy Wings
 Supplies Needed
1-2 yds light weight fabric
dye resist
dye or Jaquard soft fabric paint
dimensional glow in the dark fabric paint
Directions by Kara http://www.myspace.com/dragonsdancer
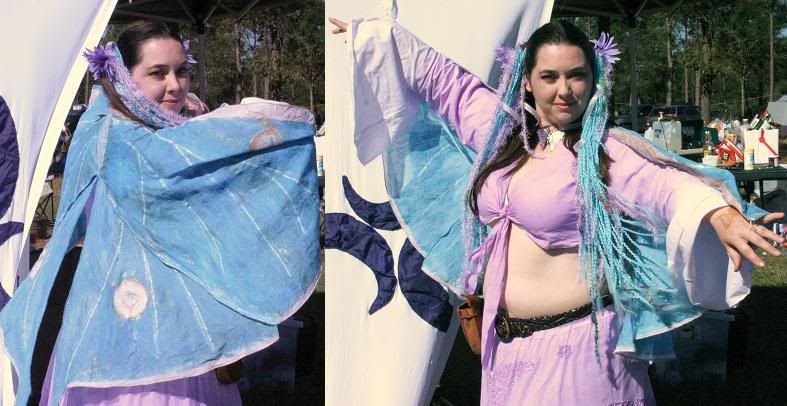
I used 2 yards of fine, undyed cotton fabric. Damned if I can
remember the actual fabric type I used, but I used the stuff we got
downtown.
I measured my "wingspan" from the the base of my middle finger, over
my shoulders and down to the opposite middle finger. I then measured
the "height" of the wings from the base of my neck to my calves.
Taking these dimensions, I used a photo of a real luna moth to provide
the mathematical ratios. In the case of the picture I used and my
real-life dimensions, I came up with a 1:33 measurement ratio.
Considering how short I am, true moth dimensions would drag the ground
over a foot behind me. So... slight modifications there.
After I had all my dimensions roughed in, I folded the fabric in half
with the selvedges even and the cut ends together. (width-wise)
I blocked out the rough dimensions of the upper wings (all one piece)
along the "top" edge of the fabric, using the fold as the center of
the wing piece. The lower wings were blocked out along the "lower"
edge of the fabric, to be cut as 2 pieces.
After free-handing in the details of the silhouette of the wings, I
cut the wings out, edged them in white thread on the serger using 10
lb. monofilament to give a little extra body to the edges of the
wings.
Then, the painting began.
I drew veins and eyespots with fabric resist and allowed the resist to
dry for the time recommended on the product bottle.
Then, I diluted jaquard fabric paint and dye down to a very thin,
watery consistency and applied in broad strokes following the vein
lines with a sponge applicator until the color and glitter suited my
fancy. I allowed this to dry for 24 hours before washing to remove
the resist and any residual paint. Then I hand painted the eye spots
using dimensional fabric paint and glow-in-the-da
rk dimensional fabric
paint, also thinned down with water to reduce any excess bulk. Veins
were painted over with glow-in-the-dark fabric paint. After another
24 hours curing time, the wings received a final washing and were
heat-set in a moderate dryer.
To avoid any unsightly seams, the lower wings were attached to the
upper wing piece with liquid stitch fabric glue along the upper edge
of the lower wings and at the center "body" portion of the upper wing,
and the outside edge of the lower wings were tacked along the
underside of the upper wing in the same manner.
After the glue had cured, the completed wings were stitched along the
upper shoulder of the top worn with the wings, and loops of thread
chainette were attached to the tips of the upper wings to attach to my
middle fingers. This kept the wings perfectly in place, and allowed
me to spread my wings at will. With my hands at my sides, the wings
appeared to be a cape-like garment.
Project Notes
None that I know of, but if you need any clarification, just contact Kara on myspace. She is one of the best costumers I know - a true artist in nearly any fabric medium.
Draped Fairy Wings
status - finished
Supplies Needed:
· 1-2yd fabric (a light polyester, silk, or linen recommended)
· 1yd canvas or other heavy fabric
· 16g wire (or heavier)
· Heavy elastic
· Industrial iron-on velcro
Optional:
· Fabric dyes or paint
· Dye resist (for patterning on dyed fabric)
· Beads, stick-ons . . . anything decorative you want to add
The Harness
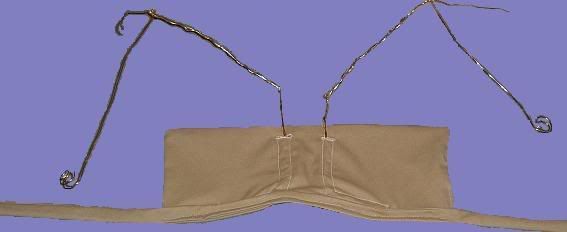
The wing harness I made goes underneath a top, so it does not need to be decorated. If yours is going to be worn outside the costume, you may want to use a decorative cover fabric or a nice heavy fabric (think brocaded upholstery fabric or faux leather). Of course you can always paint it or glue on feathers and glitter.
Step 1: Get measurements You get better measurements if someone else takes them!
You need to know:
· Your back measurement. I use the back edges of my armpits as a guide, since that’s about where the wing harness will sit.
· The measurement between the bottom of your neck and the middle of your back. Remember heavier wings need more to hold them up!
· The distance between your shoulder blades. This is a good guide for bracket pocket placement.
· Your upper arm measurement This is for the elastic arm straps.
· Your chest measurement This is taken under the actual breast, unless you plan on strapping the harness on top of them (ouch!)
Step 2: Use a piece of dress maker’s paper or tissue paper (packaging tissue, not bathroom) and draw out the harness pattern with your measurements.
Step 3: Cut at least 2 rectangles of heavy canvas to your measure (height and width). Be sure to leave 1/8”-1/2” for your seams. If you’re using a lighter material or will have large, heavy wings, you may want to cut 3 or 4.
Step 4: Sketch your bracket pockets onto the outside of one piece of canvas. Cut open the top of each bracket. You can put the bracket holes at the top of the cloth, but it won’t provide as much support that way. Also, you can buttonhole the opening, use fabric tape or glue, or even finish the seam edge – whatever you do, make sure it won’t unravel when you wear it. Be sure to place this piece of canvas where your sketch will show when you attach the canvas together! If you’re using more than 3 pieces of canvas, you may want to stitch 2 together before doing this step and put the bracket hole through both.
Step 5: Stitch your canvas together. If you only have 2 pieces, stitch the edge leaving one small hole, pull the canvas through to put the stitching on the inside, fold the open edge shut and stitch closed. If you are using more canvas pieces, stitch 2 or 3 together, then follow the above procedure with the remaining single piece and stitched pieces.
**Step 6: Stitch the pockets into the canvas following your sketch. Leave the tops open.
**If you don’t want removable brackets, insert your wing frames and hold them in place while you stitch around them closely. I suggest handstitching most of it if you decide to go this route.
Step 7: Cut the elastic to your arm measurement. You will want to stretch the elastic around your arm and shoulder to see what tension feels right to you – the tighter it is, the better the wings will stay in place, the more loose it is, the more comfortable it will be to wear. Be sure to leave 2” extra for attachment.
Step 8: Stitch the edges of the elastic to the back of the canvas. The edges of the elastic should overlap by about an inch. I usually stitch a little square into this inch to secure it. You may want to pin the armbands in place to make sure the harness will sit where you want it in the back before you sew it together. I handstitch to keep it from interfering with my bracket placement. If you’re using more than 2 pieces of canvas, you’ll probably have to handstitch anyway, since most sewing machines don’t handle that much heavy fabric very well.
Step 9: Take your remaining canvas and cut one long piece equal to your chest measurement + about 4” that is 2 1/4” wide (2” + seam allowance).
Step 10: Stitch the edges of this piece together leaving one end open, then pull through to place seam on the inside. Fold and stitch the open end closed.
Step 11: Attach the harness to the center back of the chest strap, sewing just below the bottom edge of the bracket pocket.
Step 12: Iron or sew on the velcro to the overlapping pieces of the chest strap. If you have trouble getting it to stick, try fabric glue.
For pattern and examples - Roz's Sketches
Wire Frames and Wing Fabric
The wire frame design is really whatever you can think up that will support the fabric.
Step 1: Use the measurements from your harness to bend out the bottom tabs - don't cut these off, just leave the wire your actual wing frames will be out of sticking off of it.
Step 2: Use the measurements of your shoulder to shoulder, head height, elbow to shoulder, ect to determine the width of the wire frame. I used a typical inverted V on each side, much like an angel wing. I did add an extra wire twisted around the basic frame to give me attached curlicues that will support decorative beads. This also adds to the structural integrity of the frame. I also wound up adding dowel rods to maintain the up sweep of the wing rising from the harness - I just wrapped the wires around it at the base.
Step 3: Sketch out your design and bend the wire to match. The sides don't have to be exact, but they should be similar. I've seen some neat asymmetrical designs that were done on purpose, but you don't want to be the fairy with a gimpy wing, right?
Step 4: Make sure the tabs fit into the harness. This may require a *bit* of wriggling. If you have trouble with the metal catching on the fabric, bend the ends around to make a rounded edge.
The basic instructions for the wing design I used are on the sketch accessible on Roz's Sketches. Whatever you decide on, be sure you check and double check the match to your frames.
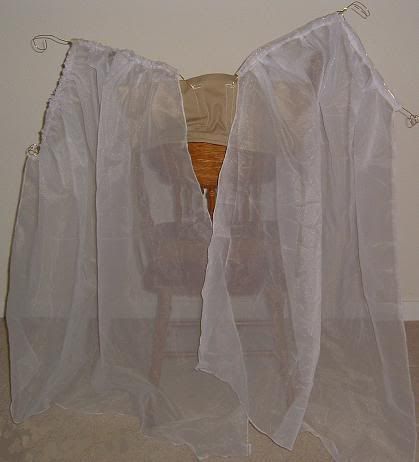
Silk Painted Wing Design and Attachment
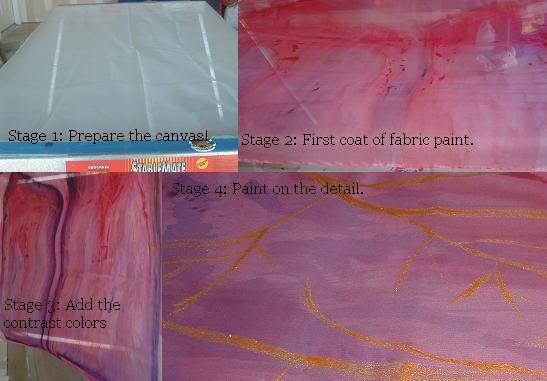
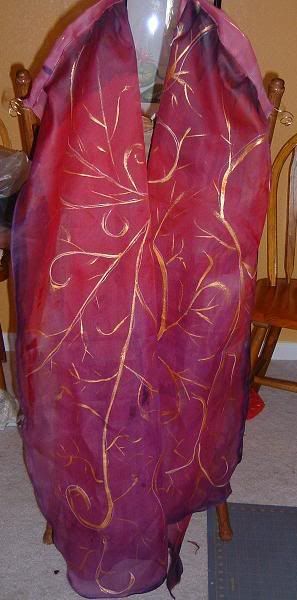
Step 1: Decide on colors and a pattern. I recommend using a natural fabric like silk or light cotton, as it will take the color better than a polyester blend. Be sure you get a soft fabric paint. Anything marked contour paint or 3-d paint is not going to work - that stuff goes on in puffy globs. I used a Jaquard soft fabric paint mix.
Step 2: Secure your fabric - you don't want it sitting directly on top of any surface, as the paint can cause it to stick. I stretched my fabric between two metal sawhorsesand secured it with some painters tape and magnets. If you're worried about dripping color everywhere, use a plastic drape or a LOT of newspaper! You may want to use a pencil to outline your wing edges at this point, so you know where to paint. Don't forget to paint some extra fabric for your harness guide! For my design you need 4 pieces the length of each section of the frame, and about 3"-4" wide.
Step 3: If you went with Jaquard, the bottle says to apply directly to the fabric. You can do this for a darker, more solid finish, but it's going to use a lot of paint, and though it still leaves the fabric soft, it's not as flowing as it will be if you mix the paint. I used a 2/3 paint to 1/3 water mix then applied that to the fabric. In some areas I applied the paint directly, then diluted it with a sponge on the fabric to create dark contrast areas. You can also mix it with flowable extender for a lighter color that is not pastel (if you mix it with white, the color ends up pastel). I did more than one paint layer to blend the lighter fuschia tones with the violet overlay, then I went over that with a small brush and some gold paint to get light accents. If you decide to paint a design, look at modern art pictures, leaves, celtic knotwork . . . use them as a general guide or a traced on pattern. I do not recommend going in blind to paint a design - fabric paint is NOT erasable and painting over it never looks right.
Step 4: Allow to dry. Rinse fabric in cold water with about a capful of vinegar to set or remove any loose tint.
Step 5: Cut out the wings and the extra rectangles of cloth.
Step 6: Finish the edges of the wings and the rectangles - you should have 4 of them if you follow my wing pattern.
Step 7: Gather the upper edge of the wings with a gather stitch or custom pleat it for a folded wing effect. Check the size of each section to be sure it will fit the frame after being gathered. Stitch the pleating or gather into the fabric securely.
Step 8: Take the rectangles of cloth and fold them over the top of the gathered fabric edge. Leave room for the harness pieces to slide through. Pin it down then stitch it securely.
Step 9: Slide the fabric onto the harness. You may want to stitch the inside edge of the wing fabric to the upper inside edge of the harness but only if you have trouble with the fabric sliding up or down too far. Try on the wings - adjust the armbands and waistband as necessary. Check the length to make sure you won't trip or catch the bottom wing hems on anything.
Step 10: Make any final frame adjustments and add decorations. TADA!!!! That's it. You're done.
Project Notes
The Jaquard fabric paint WAS easy to use, if a bit messy. It didn't go on the way I thought it would until I mixed a fair amount of water into it, but it wound up looking pretty good ^_^ The only paint I put straight on was the gold design paint. I accented that with some glow in the dark paint, so we'll have to see how that turns out.
I've finished the wire frames - they look pretty good, but the final shaping and detailing can't be done until I get the fabric on them. The mockup is done - the wooden dowel rods provided just the right lift, though I lost some of the angle with them in.
Feathered Wings
*picture coming soon*
Supplies Needed
16g wire
white, black, or colored pantyhose or
1-2 yds other stretchy material
feathers. lots and lots of feathers!
hot glue gun and sticks
1-2yds heavy canvas
elastic
heavy duty velcro
The Harness
Either follow the directions above or simply purchase a pair of cheap, basic costume wings.
The Wings
If you purchase the wings skip to Step 5. If not, here's the gist of it.
Step 1: Bend your wire using pliers or your bare hands into the basic shape you want. Be sure to include the tabs that go into the harness, made to the measurements in the harness instructions. I would suggest either a basic fairy or butterfly shape, or you can do a traditional angel wing.
Step 2a: Take the pantyhose and stretch it over the wire frame. If you've done an angel wing shape, you will want to cut the pantyhose in two pieces - one leg for each wing. If you did a butterfly or fairy pattern that has a top and bottom section, it may be easier to fit the frame if you use a leg for each of the sections.
Step 2b: **If you used fabric you need to cut it to shape (use your frame as the pattern to trace onto the fabric). Be sure to leave about a 1/4" to 1/2" for the seams. Sew the edges together but leave a hole in the bottom edge large enough for your widest wing section. Feed the fabric through and handsew the open edge shut by folding the raw edges under and stitching through the two pieces of folded fabric. You will need to leave a small hole for the tab - just stitch the fabric around it shut.
Step 3: Tie the pantyhose in the center at the top of the tab. Be sure to tie it tightly so that the fabic doesn't sag.
Step 4: Insert the tabs into the harness gently, and tuck the knotted pantyhose into the slot with the tab. You can handstitch it down if you want, but doing this means you won't be able to easily switch wings.
Step 5: Lay out or sketch out your feather pattern. You need to know what colors will go where on your wing and in what direction you want them to face. I suggest you look at pictures of real birdwings before doing this to get ideas on how the feathers should lay when the wing is folded and extended. Take time with this to prevent snags in application.
Step 6: Working in from the tips, hot glue the quills of the feathers to the fabric. Use the least amount of glue you can and cover the quills of the outer layers with the feathers from the next row. Save back the small downy feathers that seem to come in every feather bag for covering the last row of quills in the wing center.
Step 7: Repeat Step 6 on the back side so that your wings are covered in feathers, back and front. Use special care not to let glue seep through the fabric to your feathers on the other side!
Project Notes
You want a clean, dry, hard work surface to do the glueing, and a big plastic bowl to keep your feathers corraled. You'll want to check periodically to make sure you're not glueing the wings to the work surface. I won't even go into the number of times I did. When you do the reverse side, it's really important to keep the glue from oozing to the other side. If it does, you'll have to either recover the affected feathers that are now shiny and stiff, or rip them out and replace them.
Costumes and Crafts Stumble!