
Crash Course Wiki Construction
by [Dark Side of the Moon]
So you want to make a wiki but, like me, you're impatient and just want to get right down to it without having to read much? Then the Crash Course Wiki Construction is for you! You'll learn what you need to know about the pseudo-HTML tags that Elftown utilises in a quick-glance manner. So, without wasting anymore of your time, here we go!
**Remember: HTML tags are case-sensitive. Either put them in upper or lower case, but never mix the two because it won't work.
<hr> and <HR> are fine. <Hr> and <hR> won't work.
[
# The Bold Tag]
[
# The Italics Tag]
[
# The Underline Tag]
[
# Combining Tags]
[
# Changing The Font Sizes]
[
# Alignment Tags]
[
# Making Links]
[
# Placing An Image]
[
# Conclusion]
To begin with, choose a name for your wiki. Go to the long box on the right side of your screen to the section that says "wiki page":
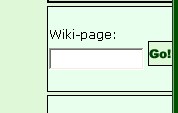
Type in a name there. If another page comes up that says "This is a blank page", that's where you start. If another page comes up with something on it already you'll have to choose another name for your wiki.
<hr> This is the simplest tag of all. It makes a horizontal line across the page and acts as a divider.
<b> and </b> This is the "bold" tag. To make your text bold it must be written like this:
<b>I'm writing something in bold text.</b>
So then it looks like this when the changes are submitted to the wiki page:
I'm writing something in bold text.
The / next to the b indicates an end tag. Always be sure to put an end tag where you want the bold text to end.
[
#]
<i> and </i> This is the "italics" tag. To make your text in italics it must be written like this:
<i>I'm writing something in italics.</i>
So it will look like this:
I'm writing something in italics.
Be sure to use the end tag where you want the italics to end!
[
#]
<u> and </u> This is the underline tag. To underline something it must be written like this:
<u>I am underlining this sentence.</u>
So it will look like this:
I am underlining this sentence.
Be sure to use the end tag!
[
#]
What if you want to combine these tags? What if you want it bold and underlined? This is easy. Look:
<b><u>My sentence is bold and underlined.</u></b>
Note that the sentence is written beginning with the bold tag first then the underline tag. When it is finished the end underline tag comes first then the bold tag. Like this:
<b><u> </u></b>
The first tag used must always be the last end tag. If this sounds confusing, don't worry. A little trial and error will help you learn and with a little practice you'll learn it quickly!
My sentence is bold and underlined.
Now let's try all three tags:
<b><u><i>My sentence is bold, underlined, and in italics.</i></u></b>
**Note the order that the tags are placed in!
My sentence is bold, underlined, and in italics.
Or, if you want to be really fancy:
My sentence can be put in <b>bold text</b>, <i>italic text</i>, or even <u>underlined text</u>!
My sentence can be put in
bold text,
italic text, or even
underlined text!
[
#]
To change the font size is really easy also:
<h1> and </h1>
This makes the font really big!
<h2> and </h2>
This makes the font a little smaller!
You can also combine these tags with the other three you just learned about:
<h1><i>This is H1 in italics.</i></h1>
This is H1 in italics.
<h1><b><i><u>This is H1 in bold, italics, and underlined.</u></i></b></h1>
This is H1 in bold, italics, and underlined.
[
#]
<center> and </center> These put your text in the center of the page. Write it like this:
<center>
This sentence is in the center.
</center>
This sentence is in the center.
<right> and </right> This aligns your text to the right of the page. Like this:
<right>This sentence is on the right side of the page.</right>
This sentence is on the right side of the page.
[
#]
You probably already know that links to other member's houses are written between two brackets, like this: [
Dark Side of the Moon]. The brackets make whatever is in between a link. The same is done for wiki pages, but written with "@wiki" to indicate the location of the wiki page. So the link for this wiki would be written:
[Crash Course Wiki Construction@wiki]
and then it would look like:
Crash Course Wiki Construction.
To insert a weblink, simply copy it from the browser bar and past it into your wiki page. Easy!
[
#]
Placing an image requires a little more explanation.
To insert an image into your wiki page, the image must first be somewhere on the internet (FOLLOW THE
Uploading Art Rules!!) Let's use one of my images as an example:
 **Note: This image is NOT alright for you to use in your house!
This is Gandalf. I have him uploaded to
Ir-Iddyns gallery, so he has a place on the internet. To transfer an image from a web page to a wiki you need to use the <img> tag. The format for this tag is:
<img:URL>
To get the URL to an image, right click on it.
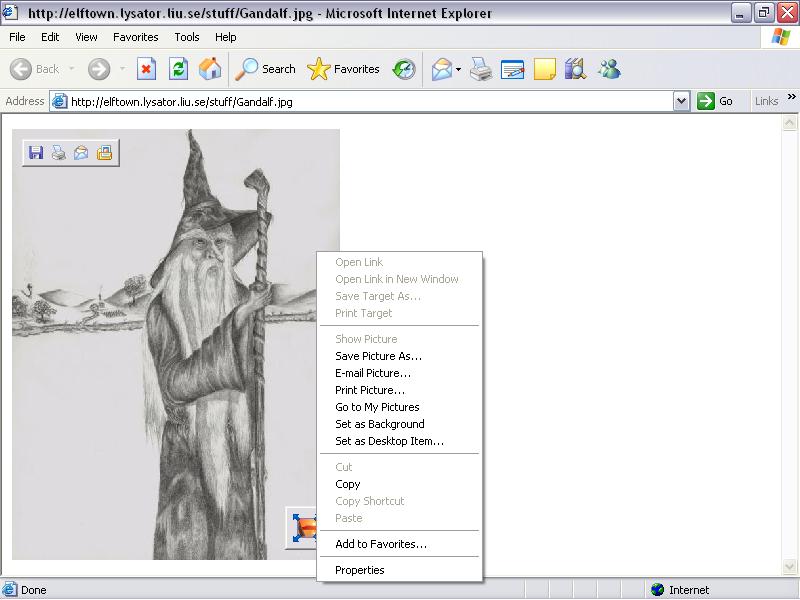
When the box shows up, go down to "properties" (usually at the bottom of the box) and click on it.
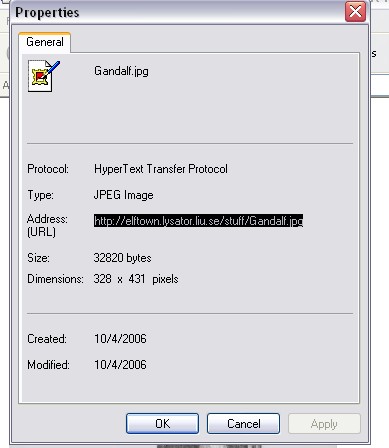
Another box will show with the image's URL on it. Highlight it by using your mouse to drag the cursor across the URL. Right click on the URL and select copy.

Now, go back to your wiki page and use the <img> tag to place the image there. It should look like this:
<img:http:
//elftown.eu/stuff/Gandalf.jpg>
Just right click after "img:" and paste the URL there. Don't forget the ">" to end the tag!
Once you submit the changes to the wiki page the image will show.
But what if the image looks huge? Well, that can be fixed also by adjusting the height and width by assigning it a pixel width. Like this:
<img150:http://elftown.eu/stuff/Gandalf.jpg>
This format adjusts the image to a width of 150 pixels and also makes it clickable so it will open in another window to a larger, easier to see size.

You can also adjust the pixels for the height:
<img25*150:http://elftown.eu/stuff/Gandalf.jpg>

Hmmm... That doesn't look so good.
[#]
If, after you've made your wiki page you see tags in red, that means that you've forgotten to either add a tag or to place an end tag somewhere. You will need to go back into edit and look for the place(s) that need the tag(s) added.
For more in-depth wiki construction, go to guide to the pseudo HTML on Elftown.
[#]
 Stumble!