Current Projects
This is my page for projects I'm working on RIGHT NOW. Which means I should update it pretty steadily, but we'll see how that works out. Anyway - once a project is complete it gets moved to one of the other pages, sorted by type.
Aes Sedai Costume
The Shawl
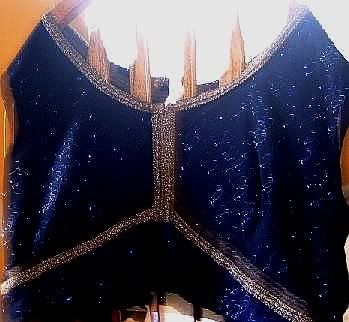 picture is pre-applique and fringe
Supplies Needed
picture is pre-applique and fringe
Supplies Needed
1-2 yds fabric
embroidery floss - lots of it for fringe
a scrap piece of contrast fabric
decorative or white thread and thread in fabric color
Step 1: Pick your fabric - in WoT the Aes Sedai shawls are always described as having a vining pattern. I decided to go with a non-traditiona
l fabric in the color of my ajah -blue- with sparkling blue vines. The contrast fabric is about 1 shade lighter than the fabric itself and the fringe matches the contrast.
Step 2: Get your measurements from fingertip to fingertip and from nape of the neck to the lower back. I'd advise not cutting it too long, since the fringe will add to the length. I did add about 2" to the length to add drape.
Step 3: Mark the length on the fabric. If you're using anything but 60", you'll need to do this lengthwise. Mark the center as well as the edges.
Step 4: Fold the fabric at the center mark you made. Using a string or a diagonal mark on a cutting board (or anything you can rely on to stretch straight)cut from the top edge to the center bottom, stopping at the fold. You should have a neat triangle.
Step 4a: **If you want a half circle instead of a triangle, leave your fabric spread flat. Attach a string to your top center mark (the string should be the length of your nape to low back measurement). Trace the path of the string from one top mark to the center; repeat on the opposite side. Then cut along that line.
Step 5: Using a rolled hem foot, a doubled hem, or a serger - finish your edges.
Step 6: Using your contrast fabric, trace and cut 2 flame of Tar Valon pieces - stitch them together, right sides facing, then pull them right side out and stitch the remaining bottom edge shut.
Step 7: Using the contrast or decorative thread, attach the flame in the center of the shawl.
Step 8: Decide what length you want your fringe and attach it piece by piece - I haven't started this yet so that's all I've got.
Costume Planning
Decided to go with Ebou Dari Aes Sedai. I'll be posting the description, book, and page number for anyone interested. I should have a chance to go pattern shopping next week so that I can finalize the design. I'll try and stick with the described dress as much as possible, but certain details will have to be traded for more practical concerns. The sticking points are the deep but narrow neckline, the wide belt, and the petticoats. Wish me luck on my hunt!
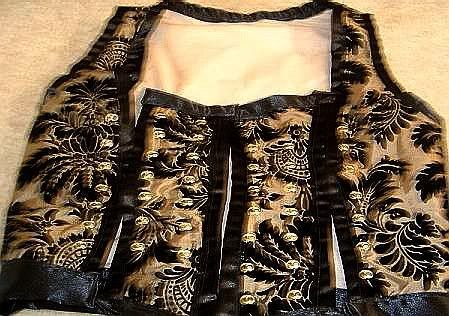
Front and Side Laced Bodice
Supplies Needed
1-2 yds heavy fabric
1-2 yds lining
1yd boning
2-3 yds binding or ribbon
28 grommets
Optional: 1-2 yds interfacing, weight varies
Step 1: Measurements! Check your measurements against the pattern sizing and adjust as necessary. I'd be especially wary about the shoulder strap length and the arm holes.
Step 2: Cut or trace the pattern and attach it to the fabric. Remember you need to cut each of the needed pieces out of each layer - outer, lining, and interfacing. Don't forget to mark your grommet holes on the right side of the lining for each side of the front panels and the front facing part of the side panels!
Step 3: Stitch the front panels per pattern directions, right sides facing out, raw edges all around. Be sure to iron your fabric flat before you do this to get a nice match between layers.
Step 4a: Attach the back and side pieces together to make one large back piece (including armhole and shoulderstrap) for each of the layers. If you're using interfacing, attach it to your lining first, then sew the lining pieces together.
Step 4b: Place the lining and outer layer together, right sides facing in, and stitch the top and front shut. Don ot stitch the armhole shut or you won't be able to turn it right side out again! Clip your seams to get rid of excess fabric, then turn it right side out and press it flat.
Step 5: Sew the bottom of the back piece together, raw edge out.
Step 6: Attach your binding - be sure to do it in order or inserting your boning will be more difficult! First, the lengthwise pieces on the front bodice panels, then one long piece (or 3 shorter ones) around the neck and lengthwise on the side-front of the back piece. Insert the boning carefully (I dipped mine in hot wax to prevent the plastic from fraying and to make the end smoother). Once the boning is in, sew the top and bottom pieces on to the front panels. You may want to cut each of them a little longer than necessary so that they can be folded under to leave a smooth, finished side edge. Then attach the binding at the bottom of the back piece and around the armholes.
Step 7: Remember the grommet holes you marked out? Now you get to double check them - make sure they match up - then punch them out with a nice little pair of grommetting pliers.
** Didn't mark them? No problem. Get the inner lengthwise measurement from each of your front panels. Subtract about 1/4" - 1/2" for spacing from the top, then divide by 7. This is your lengthwise spacing. You will want to set the depth at least to the inside of your binding - the further in you set it, the tighter the fit.
Project Notes
This project was based on Simplicity pattern 9966, with a few changes in method. The end design is essentially the same.
Arafellin Gleeman
My husband wants to be an Arafellin gleeman - which is great - except that so far I haven't found any great descrips of Arafellin garb, other than that they wear bells in their hair and often on their clothing as well. Oh - and they tend to wear red, yellow, and white - the national colors of Arafel. The gleeman part is easy - he'll have his contact spheres, drum, and a patched cloak.
The Gleeman's Cloak

Supplies Needed
More info coming soon
My First Knitting Project
The dishrag
*pictures coming eventually*
Supplies Needed
cotton yarn
knitting needles
a comprehensive guide to knitspeak
Step 1: Pick a small damn project, otherwise you'll get overwhelmed
Step 2: Learn to do a slipknot - wrap the yarn 2x around the first two fingers of your left hand, then hook one of the loops around your needle and pull it through the other one. You have to keep tension on both ends of the yarn to pull the knot tight, but not TOO tight. It took me about 3 tries to get it right.
Step 3: Cast on your first row. In knitspeak it's called CO. You just hold the needle in one hand and pull the thread between thumb and forefinger and into the palm. Hook the yarn onto the needle from the backside of your thumb and pull it to the right. It makes a little loop that's just barely twisted shut. I did 45sts - that's 45 stitches.
Step 4: Knit one row - the thread should be to the front of the needles, the needle with the cast-on rows held in your off hand and the naked needle in your on hand. Put the needle through the loop of thread, pushing it under from left to right (if you're right handed, then hook the working yarn and pull it back under the loop. Slide the loop off the end of the needle and repeat ALL THE WAY to the end. For those counting, that's 90 repetetive movements and you've just now barely finished 2 rows. Damn.
Step 5: Purl one row - it's just like knit except that you keep the working thread to the back of the project (that's the side facing you) and push the needle through from right to left, hook the working yarn and pull it back through. Then slide the loop off the needle and repeat another 45 times.
Step 6: Do another row of 45 stitches, knit one purl 1. Repeat this until your hands seize up in protest or until you're nearly out of yarn. I suppose you could stop as soon as you think you have a big enough dishrag too.
Step 7: Realize that in knitspeak you have just CO 45, k45, p45, *k1,p1* repeat. At least, I think that's how you say it. I'll ask Kara - she is the spin/knit queen.
Step 8: Bind the edge. I haven't got that far yet.
Project Notes
I'm doing this to learn how to knit well enough to start on a shawl for my Aes Sedai costume. I could sew a stole or something, but the knit shawl seems more true to the descriptions in the books. I've tried knitting before (My dearest friend Kara is a knitfiend) but I didn't do very well. That might've had something to do with the booze imbibed the same day as my abortive project . . . I don't know. Anyhow, this one is going better.
***Update***
This project is taking FOREVER. I've had to rip my stitches a couple of times and start over again. I don't think it will ever be done, but I am persevering. I have decided that learning to knit is worthwhile, but for my Aes Sedai shawl, I think I'm gonna stick with fabric arts I know - probably cloth with a sewn on fringe and an applique Flame of Tar Valon.
I'll still post a picture when there's enough of it done to matter.
Costumes and Crafts
| Show these comments on your site |
 Stumble!