Wiki:
Page name: How to Ink in Photoshop [Logged in view] [RSS]
2005-06-20 16:48:50
Last author: Asrun
Owner: Asrun
# of watchers: 19
Fans: 0
D20: 20
Bookmark and Share
<img:stuff/asrundivider>

<img:stuff/inktitleet.jpg>

<img:stuff/asrundivider>

Written by [Asrun]


<img:stuff/asrundivider>

First Step: Preparing your sketch and organising Layers

<img:stuff/inktut1.jpg>

When it comes to Photoshop, and most other imaging programs, the order in which you place your layers is extremely important. In most cases, your line work will be ontop of your coloured work.

Here, you can see that I have a sketch drawn with pencil scanned in. I've kept it quite large in order to keep as much detail as possible. The larger the picture, the more detail you'll be able to encorporate. 

Open your Layer Window. Window > Layer (show)

I've placed the sketch on a new layer. Layer > New in your options bar. Or just press the button on your layer window that looks like a new page (directly to the left of your trash can). To transfer your sketch from the background layer, press ALT + A on your keyboard to select the entire image. Then Press CTRL + X, make sure your on Layer 2 (the layer will be selected) and press CTRL + V. This will cut and paste your image on the desire layer. In this case Layer One or Two. I have mine set up to Layer 2. Change the Opacity of your sketch layer to 25-45%. You'll find this option at the TOP of your Layer Window. This will allow you to see your sketch lines, but also your ink lines

Now, press the New Layer Button. Make sure this layer is ABOVE your sketch layer. The names of your layers doesn't really matter as long as you put them in the right order. You can move your layers up and down by holding down your left mouse button and dragging them up and down. This will be where your inks will go.

You're now done step one! Only 1283109283 more to go. Don't give up! It's easy once you get the hang of it!

<img:stuff/asrundivider>


Second Step: Preparing your Inking Tools

<img:stuff/inktut2.jpg>

Select your PAINT BRUSH tool. The go to Window > Brushes (Show) this will bring up your brush options. Select Brush Tip. Change your brush to these settings. Diametre: Between 2-5 pixels, depending on the size of your image. Never use a 1 pixel brush. It looks pixelated. I usually use a 2 pixel. Angle 0, Roundness 100%. Hardness 100%, Spacing 25%. Your brush should look like what is on my screen. Under Shape Dynamics, make sure everything is at ZERO except for Minimum Diametre. Set that to 1%

Now your brush is ready for inking!

<img:stuff/asrundivider>


Third Step: INKING!!

<img:stuff/inktut3.jpg>

So, now you're ready to ink. Make sure you have selected your Ink Layer. The transparent layer above your sketch. Click your Pen Tool, Not any of those fancy pens. Make sure everything is selected on your toolbar (right under your file options) like I have here. Now, click at a point where you want to start inking. At the end of that line (or at a large curve) click and HOLD your mouse button down. Move your mouse from side to side. You should now be able to manipulate that curve to run along your lines. You can only do ONE LINE AT A TIME. I know, it's time consuming, but in the end you'll have a beautiful ink job.

Onto the next step...

<img:stuff/asrundivider>


Fourth Step: Applying the Inks


<img:stuff/inktut4.jpg>

With the pen tool still selected, right click on your mouse and select "Stroke Path" as seen here.

<img:stuff/inktut5.jpg>

Now, select your paintbrush (you didn't select another type of paint brush, right? RIGHT?) And click "preserve Transparency". Press "Okay"! With some enthusiasm now! Com'on!!.... Okay.. right.

<img:stuff/inktut6.jpg>

Now, right click again, and press "Delete Path".

<img:stuff/inktut7.jpg>

Now, click the little eyeball beside your sketch layer. This will make that layer invisible. Now you can see the ink work you've done so far! Woo! Pretty, isn't it? See how it fades out like that? That's the "Simulate Pressure" Without that, it'll be blocky, which it also a neat effect. To bring it back your sketch layer, click on the eyeball again.

<img:stuff/asrundivider>


Sixth Step: Tricks of the trade

<img:stuff/inktut8.jpg>

After inking your image on one layer, make a new layer above that and add some whispy hairs on the new layer.  When done, go back to your original ink layer and erase any of the lines that cross those ones. You will now have some lovely movement in your hair and a neat layered effect. Dynamics people! Think of it!

<img:stuff/asrundivider>

Seventh Step: Finished Ink

<img:stuff/inktut9.jpg>

Now your inks are done. You should have something that looks like this! :D Place all of your colouring layers underneath your inks, and have fun. You can also change the colours of your inked lines be pressing Preserve Transparency on the ink layer (s) and colouring over them. 


<img:stuff/chrismaslarge.jpg>

Congratulations. You should now have a beautifully inked image. For any questions, or clarification, please leave a message in the comments box, or contact me.

I hope you found this helpful! :D

Username (or number or email):

Password:

2006-04-09 [Asrun]: Dunno then. This is for 7. :( I don't think the brush window was offered until version 7

2006-04-10 [eyes of frost]: They are...*sniffles* IN fact this tutorial works with photoshop 6...my computer and photoshop are just being totally evil...

2006-04-11 [Asrun]: awww2

2006-04-12 [eyes of frost]: .....*Sighs* I am just getting a new version. So it SHOULD work lol with the new one...

2006-04-12 [Asrun]: hopefully. :)

2006-04-13 [eyes of frost]: Yea...I hope. :(

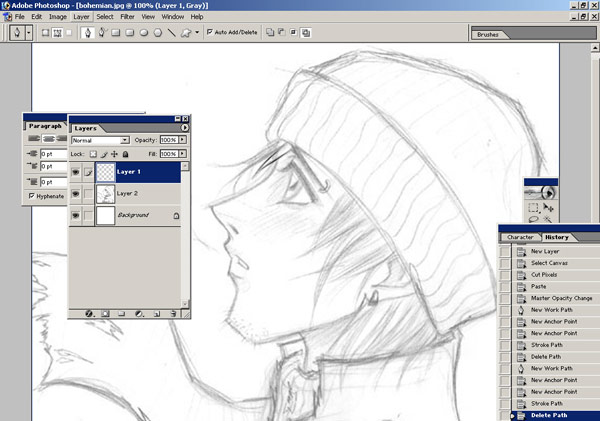
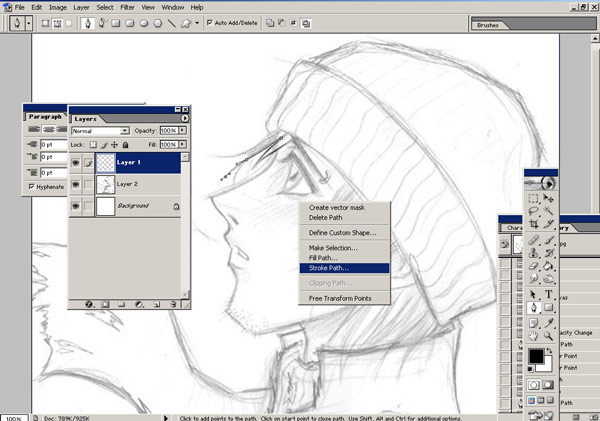
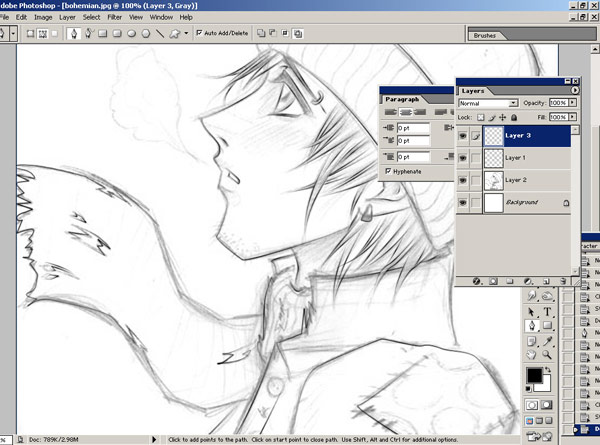
2006-07-01 [Seamus Schwathe]: I'm sure this is easy to fix, but I don't know how. Whenever I use the pen, it fills in the hollow of the curve rather than having just a line, and it makes each individual segment into a new layer. Here the first is done in a big obvious red. How do you stop it from doing this? <img:http://elftown.lysator.liu.se/img/drawing/79514_1151751562.jpg>

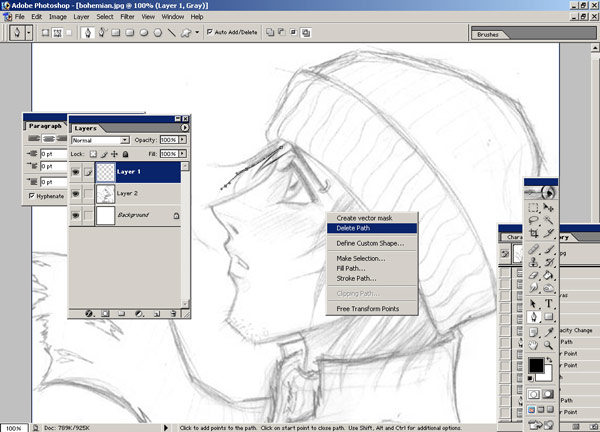
2006-07-02 [Asrun]: Make sure you select "Stroke to Path" and not "Fill to Path" and don't have anything selected that says "Mask" or "New Shape

2006-07-07 [Seamus Schwathe]: Where do you select/unselect that?

2006-07-07 [Asrun]: right click, "deselect"?

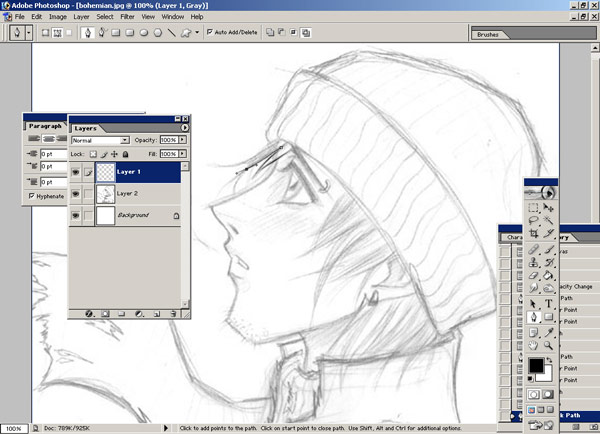
2006-07-08 [Seamus Schwathe]: Yay! I figured it out! Now just one more thing (I think). Can you outline an entire shape and then apply the inks, or is it necessary to do so for each individual line?

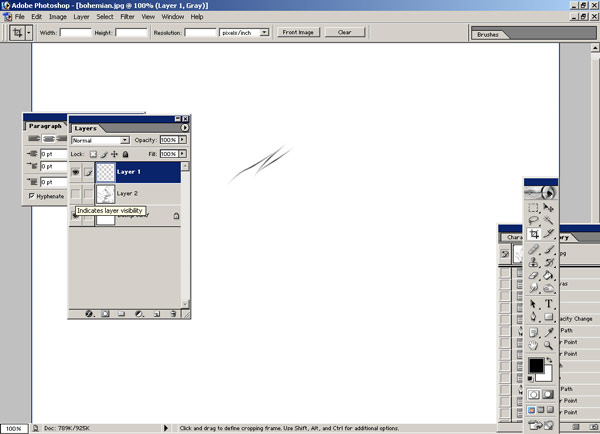
2006-07-08 [Asrun]: In order to get sharpe corners, and line variation, I find it best to do each line separately

2006-07-09 [Seamus Schwathe]: Okay, no more questions ---for now. Thank you!

2006-11-14 [Fetish Dolly Koneko™]: My pen....only seems to do straight lines..and the more i move my cursor one way, the line also goes another way and it doesnt line up ith my art. Granted I dont know how to use photoshop....but I thought this would be easy enough :(

2006-11-14 [Asrun]: You have to hold and drag. You click to start your path, then click the next point, but DON'T release your button, you can then move your mouse to make it a curve

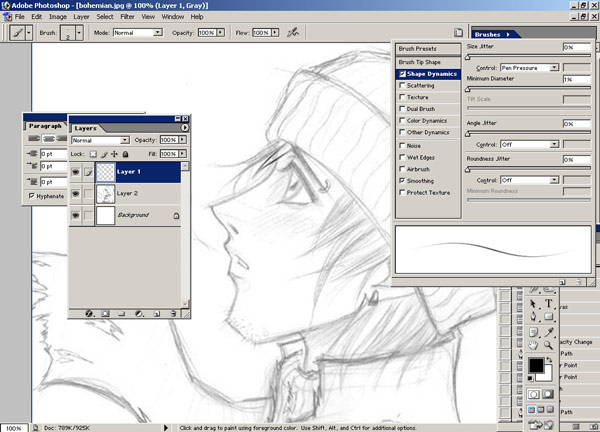
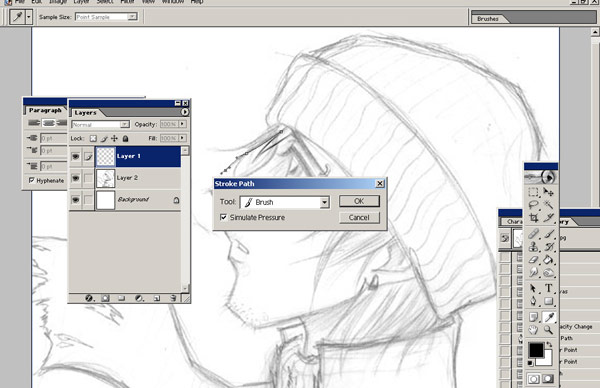
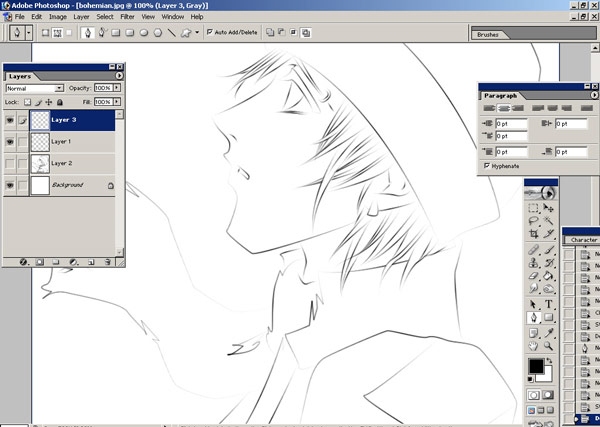
2008-08-06 [ccb51310]: Ok, ummm, sorry to bug you, but my brush in the window does not look like yours, it does not have the thin beginning and end, and fat middle, it is a constant size the whole way through, I have seen many tutorials with your preset look, but I can't figure out why mine is any different...can you help?

2008-08-06 [Asrun]: My photoshop does that on occasion as well. I don't know why. But sometimes just restarting the program changes it back to the thin, thick thin.

Otherwise, i don't know how to help. It seems to be a CS2/3 problem.

2008-08-06 [Zab]: I never had brushes like that either untill I got a tablet :P
(Now they're there with or without the tablet..O_o)
But the linnes came out thin in the edge anyway, when I used the tutorial. (Sometimes they don't, then I have to restart PS)

2008-08-06 [ccb51310]: Thanks, I'm fiddling with the brushes to make the inking look right, it is a chore, but once I figure out how to manipulate the brush the way i want to, it will be good...thanks for the tutorial, and thanks for the insight Asrun and Zab...

2008-08-07 [ccb51310]: well, when in doubt, fiddle...I got the right effect, and with minimum trouble, I just did it a long way, but got the same lines, and nice and smooth too...alot of effects are easily duplicated, though can be drawn out in like a hundered steps to achieve the same thing, just the way you did it SHOULD be easier, but my CS2 is being funky and will not do the brush strokes the way I wish, well thanks for all the help!

2008-08-11 [Asrun]: My CS gets funky too. Like I said, this tutorial was done in PS7 where that was the default set up. :/ 

Number of comments: 201
Older comments: (Last 200)

200 older comments
(0, 0-11):

Show these comments on your site

Elftown - Wiki, forums, community and friendship.