Craft Projects
This page mainly consists of projects related to costuming that aren't mainly sewing.
Goat Horns
 Supplies Needed
16g wire for frames (or other preferred material)
sculpey, wonderflex, or other construction material
apoxie sculpt, wonder smooth, or other texturizer if using wonderflex
paint
wide headband or heavy cloth strip (long enough to tie in back)
Step 1: Look at real horns, decide what style you like and what will be practical for your event (and budget). For little horns, I suggest
http://www.phobe.com/horns/
Step 2: Based on size and budget, decide on materials. I'm doing a wire frame with a thermoplastic covering because these horns will be about 6" tall. Sculpey, foam, paper mache, apoxie scuplt . . . these are all options and then some.
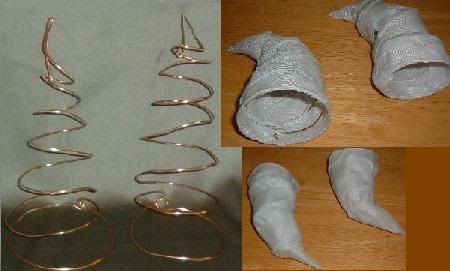
Step 3: If you're using a wire frame, make it - twist the wire into the shape you want to use. Play with it until you've got two horns of equitable size and design. Be sure to think about how you will mount it at this stage. You may need to leave wire at the botton to secure it to a headband, though you can add wire later. You can also use carved foam or ducktaped newspaper - you just need something to hold the basic shape of the horn.
Step 4: There are a few different ways to cut the wonderflex. You may want to use paper or even glad wrap as a practice sheet before you cut into the wonderflex. Anyway, the two methods I would suggest are either - cut triangle with a rounded bottom to wrap the frame in - basically a cone, or cut strips and wrap the frame in sections, bottom up. Either way - measure twice, cut once! Get the height and diameter of the horn at intervals up the side - what measurements you need depends on what method you want to use. I used the second option, since I wanted to use the overlap to create the basis for ridging up the horns. That, and The horns curve out and back, so I thought it might be easier to get the thermoplastic to form up in small strips.
Step 5: Heat the wonderflex until is soft and pliable. I used a cheap blowdryer, but I've heard of people using steam from an iron, boiling water, or a heat gun. I went with what I had lying around, and it worked quite well. Anyway, once you have at least an edge heated, you can start wrapping the frame. If you mess up or need to straighten up part of it or move it around, you can always reheat that edge to loosen it and then rebend it as needed.
Step 6: Attach your horns to your headpiece.
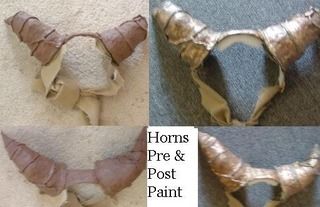
I'll be using a large plastic headband. Correction: The headband lost its flexibility when I attached the horns with strips of wonderflex. I actually wound up using a strip of cloth with a wonderflex centerpiece to give it stability. First, put the headpiece on, then hold the horns up to it and mark the headband or cloth about where you want the horns to sit. Take off the headpiece and attach the horns with strips of wonderflex. Once they are secure, try it on again. It really helps if you have someone else do this for you, so they can reheat the wonderflex and bend it to the band while you have it on. You have to be REALLY careful if you do this not to let it bond to hair or skin, and avoid singeing the same while you heat the plastic.
Step 7: Apply your paint and or texturizer. I'm using apoxie sculpt to cover the texture of the wonderflex and to do the detailing for the ridges and stuff. The apoxie sculpt is relatively heavy and sticks to everything - apply with care!
Project Notes
I've never worked with wonderflex before and WAS hella nervous. Turns out, wonderflex is pretty simple to use. I had no problems wrapping the wire frames, and the overall shape looks pretty good.
The horns weigh about 3oz apiece right now. I'm hoping to keep the whole set under a pound, but it depends on how much weight the headband and apoxie sculpt add.
The bottom of the horns with attached wonderflex were too wide for the headband to handle. What a bummer! Essentially, I had to make the headband using canvas cloth and wonderflex. This was a SERIOUS pain in the ass because wonderflex doesn't like to stick to cloth. I had to wrap the cloth band and overlap the wonderflex to get decent stability. Still, it's turning out well.
Wands
 Supplies Needed
Wire or other frame substance
Versatool or similar burning implement
beads or other decorative items
sculpey, apoxie sculpt . . .
Step 1: Decide on your design and materials. I made 2 different wands - 1 bone wand with a celtic design and a more traditional wand of apoxie sculpt.
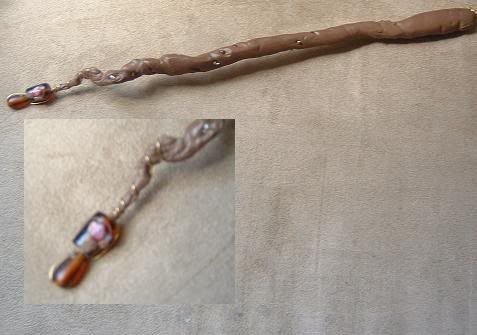
Step 2a: For the apoxie sculpt wand, I used 20g wire to create a basic frame. On one end I made a loop and on the other I left the wire loose to use on the beading.
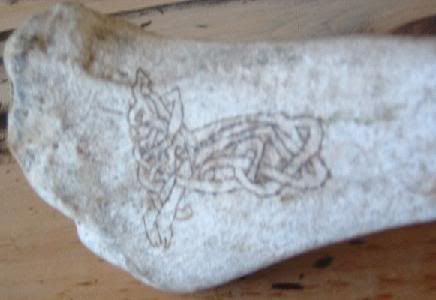
Step 2b: For the bone wand I cleaned the old horse leg bone and disinfected it.
Step 3a: I rolled the apoxie sculpt around the wire and made a long roll of it, then twisted and pulled it to shape. I made sure to catch the raw edge of the wire loop and keep it covered in apoxie sculpt.
Step 3b: This is where you spend hours deciding on a design that will not only look good once burned in, but that can actually be burned in. Then you sketch it onto paper, cut the sketched design out to use as a stencil (that way each version on the bone looks about the same. There are 3 on the one I made).
Step 4a: I decorated the wand shaft with little beads from just above the handle to near the tip. Then I took the larger beads and threaded them onto the wire. Once they looked secure, I took the raw wire edge and pushed it back into the apoxie sculpt, smoothing over it.
Step 4b: Carefully place the stencil on the bone and tape in place. I use small strips of painters tape because it won't tear the paper stencil. Transfer the design. I had to hand draw a lot of the knotwork because if I cut the stencil at every crossed line, there would be no stencil left!
Step 5a: Make final shape adjustments, then take the wand by the wire loop at the end. Hang it from a tack or nail in a doorway or windowsill to allow it to dry without getting a flat spot.
Step 5b: Following the transferred design, use the basic versatool tip to burn the pattern into the bone. Remember slow and easy gets the best results.
Costumes and Crafts Stumble!