Page name:
Photoshop Layers for Newbies [Logged in view]
[RSS] 2009-01-28 08:47:20
|
# of watchers: 3
|
Fans: 0
| D20: 15 |

Photoshop Layers for Newbies

“Layers” is one of the most important palettes on Photoshop. Composition, design and painting digitally are way easier just because of this feature. This is an in-depth tutorial on Photoshop Layers for newbies!
The layer Palette comes up by pressing
F7 or by going to the drop down menu
Window> Layers. It’s usually on by default on your right side of the screen.
[
#The structure of the layer palette]
[
#An In depth look]
[
#Blending Modes]
[
#Locking Icons]
[
#Blending Options]
[
#Adjustment Layers]
[
#Groups]
[
#Merging Layers]
[
#Shortcuts]
The structure of the layer palette:

On the top side starting from the left is the drop down menu of the
Blending Modes, the
Opacity modifier and the
Fill modifier.
Next are the icons that allow you to lock layers in different ways. a) The first icon

locks transparent pixels, b) the second icon

locks filled pixels, c) the third icon

locks moving and dragging and d) the fourth icon

locks the layer in general.
The Layers along with the preview and special features such as styles, lock etc.
The seven icons at the bottom of the palette that are for a) Layer link

b) the list of the available effects

c) the layer mask tool

d) the adjustment layers

e) the groups button

f) the “add a new layer” button

and finally g) the “delete layer” button.

A small arrow button

on top right corner that gives a list of available commands.
An In depth look
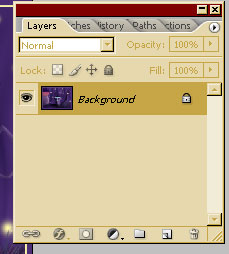
If you open any photograph/pic
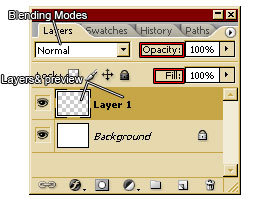
ture on Photoshop, it usually has only one layer that is by default named Background. This layer can’t be moved and while most of the commands are available, we can’t change the blending mode or the opacity. It is also always last since we can’t move another layer below it. This can be also noted by the lock icon on it.
If you drag another image on the background you’ll see it’s gonna be named Layer 1 and it will go above the background.
.jpg)
If we want to free the Background layer and turn it into a regular layer there are two simple ways to do it:
Double click on the layer (anywhere far from the name because if you click on the name it opens the Rename field. Hit ok
Right click on the layer and choose the option Layer from background. Hit ok.
The first way is much faster :)
.jpg?y=0&x=500)
If you want to change the size of the preview or make it disappear completely you can right click on any preview and pick what you prefer.
.jpg)
If you right click anywhere on the layers the first choice in the menu is the Layer Properties. In this window there are several options where you can rename the layer or add a colour on the layer so you can tell a certain layer apart from the rest.
.jpg?y=0&x=400)
The central part of the palette allows you to view all the layers you have available in the current file.
You can change their order by dragging those around. Layers close to the bottom are considered “behind” the layer above them and any filled pixels in the above layer will hide the contents of the layer below.
By holding shift and clicking you can select multiple layers and move/link/paste a layer style on them at the same time. You can also go to the drop down menu Layer> Group Layers to group your selected layers.
.jpg)
On the left of each layer there’s an eye icon .jpg) that indicates Layer visibility. By clicking on it we can turn it on or off that layer. By holding alt and clicking on a certain layer’s eye you can turn the rest of the layers on or off, excluding the one you have chosen. In the one below I have turned off the Kimono layer on the right image.
that indicates Layer visibility. By clicking on it we can turn it on or off that layer. By holding alt and clicking on a certain layer’s eye you can turn the rest of the layers on or off, excluding the one you have chosen. In the one below I have turned off the Kimono layer on the right image.
.jpg?y=0&x=400)
Blending Modes
Blending modes is a very powerful tool in Photoshop and very helpful in Photomanipulations. You can make stunning pieces with fiddling around with those modes especially if you want your piece to look more natural and connected like in this:
.jpg?y=0&x=400)
In this Witch photomanipulation I used a layer with violet and white “clouds” (Filter> Render> Clouds) and changed the blending mode and the opacity to give it a more mystical atmosphere and to give all the photographs used a certain lighting that makes the piece look more natural when compared to the image on the right that has that layer turned off.
Another example can be seen in the Elven Priestess image, where I added a dark green filled layer that gives the image a foresty lighting and connects the photographs used.
.jpg?y=0&x=400)
This of course would be impossible if it hadn’t been for the layers :)
Locking Icons
.jpg)
These 4 tools are usually overlooked by novice users of Photoshop but their role can make everything much easier.
Lock Transparency Pixels Icon:
With this icon on you can paint/modify freely on anything on the layer that already has some content. This is very good for colouring Lineart (see [Calico Tiger]'s How to Color Lines for more info)
Lock Image Pixels Icon
By setting this icon on you lock everything on your layer that has content and can only modify the transparent pixels.
Lock Position Icon
This icon when on, prevents moving pixels of the layer around.
Lock all icon
This icon when on, locks the layer in general and prevents all kinds of modification, including deletion.
Blending Options
The styles icon gives you a dialog window with all the available effects and blending options. When you add an effect, it will appear below the layer with its own visibility eye. You can turn off all the effects you might have applied or just one. In this picture you can see that I have turned the outer glow for the stars off on the picture on the right.
.jpg?y=0&x=400)
The “Add layer mask” icon adds masks. Unfortunately my knowledge on the subject is extremely limited but there’s a very nice tutorial on masking by [Ocean Soul] here: Why textures?.
Adjustment Layers
This button adds an adjustment layer, which is an easily manipulative layer with commands coming from the Image>Adjustment menu like Brightness/Contrast, Hue/Saturation etc. You can adjust the values here to your liking and the changes aren’t permanent. You can re-modify them again any time
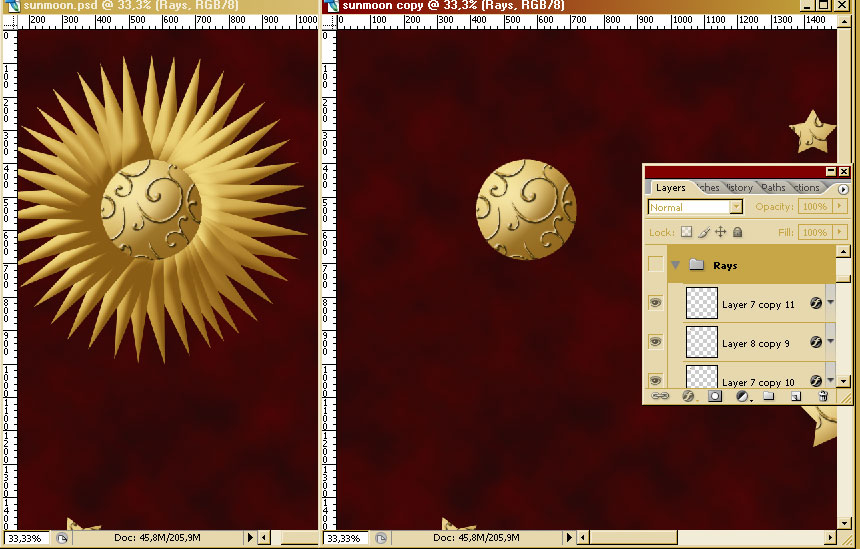
Groups
Groups allows you to “team” certain layers so they won’t take up the space of your palette but also to be able to select its contents faster. I usually do this with vector art where a sun graphic might consist of 40 layers that I’d have to select manually
In this picture I have the rays of the sun all grouped and I can edit them fast. In the example icon I have turned them of my turning the group eye off.

Merging Layers
One command that you'll probably use very often when you begin to handle Photoshop more easily is the Merge Down command and probably the Flatten image command. I personally don't use the latter much unless I want to make graphics from a bigger drawing of mine.
Merge Down will merge your selected layer with the layer below it. Be careful because the layer above loses all the effects you might have applied. If you want to keep these effects best is to create a new layer, drag it in between the two layers you want to merge and Merge down. This will make a flat layer with the effects you had applied embedded on it permanently so be very careful of what you merge. The resulting layer will keep the effects of the last layer if it has any. If you have selected more layers than one the same rules apply but the command will be Merge Layers instead of Merge Down.
Merge Visible turns all the visible Layers into one Background Layer. The invisible Layers will remain as they are.
Flatten Image turns all the visible Layers into one Background Layer. The invisible Layers will be lost.
Shortcuts
The most usual commands on Photoshop have their own shortcuts, which makes working much faster. After Photoshop 7 (if I recall correctly) there's an option to create your own shortcuts as well!
Alt+Ctrl+Shift+E: Duplicate Layer
Ctrl+Shift+N: Add a new layer
Ctrl+j: Layer via Copy
Ctrl+Shift+j: Layer Via Cut
Ctrl+]/[: Moves layer one up/down
Ctrl+Shift+]/[: Moves Layer first/last (unless there's a background layer)
Ctrl+E: Merge Down
Shift+Ctrl+E: Merge Visible
Ctrl+G: Group Layers
Ctrl+Z: Undo (if used twice works as redo)
Ctrl+Alt+Z: Continuous Undo (up to where the history has saved)
]-Go back to
[Jitter] or or Jitter's Tutorials or Elftown Tutorials
| Show these comments on your site |
 Stumble!
.jpg)
.jpg)
.jpg)
.jpg)
.jpg)
.jpg)