Page name:
How to Color Lines [Logged in view]
[RSS] 2005-08-10 19:00:04
|
# of watchers: 18
|
Fans: 0
| D20: 12 |
Coloring the Lines
By [Calico Tiger]
[
Warning! This page has a ton of graphics to help illustrate the directions!
]
This is a tutorial on how to color the lines of a drawing in photoshop. It looks like a lot, but really it's not that hard. Once you get the hang of it, it's very fast! This should also work mostly the same in paintshop (depending on which version you're using). Things will just likely be located in different places. But the same theories should work fine :)
Step 1 -
Preparation
Scan your picture in. Seriously. Now. Do it! Generally I save it as a .bmp image to get a good quality save on that. But, of course, do whatever works best for you. I also scan at 100% size (which on my scanner shows up as twice the size as the image I actually drew). I find that working with large images is much easier than smaller ones.

--------------
--
Step 2 - "Inking"
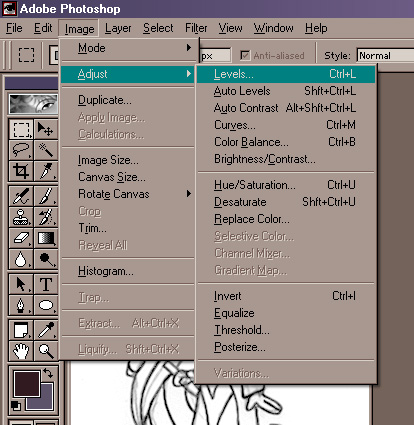
Open up the picture in photoshop. Now we get to the good stuff. Go up to the top menu bar. Click on Image, go to Adjust, and click on Levels (See img 1). This opens up a bargraph-like errr.... graph. On the right, you'll see a bunch of taller lines. On the bottom are three arrows.
 img 1
img 1
Pull the farthest right arrow over to the left till it gets over the biggest of the slopes. What this does is clean up most of those extraneous gray lines and areas (it's a quick way of cleaning up a good amount of the image). (see img 2)
Next, pull the farthest left arrow over to the right till you're happy with the darkening of the lines (this is a quick and dirty way of "inking" the image).
It's not going to be perfectly clean, most likely (as we can see in img 2). We'll take care of that later.
 img 2
img 2
----------------
Step 3 - Layering
If you're using photoshop, hit the d key. This should set the selected colors as black and white (main color black, secondary color white). Or you can do it manually using the color picker, but hitting d is much faster.
Go back up to the top menu bar. Click on Select, then click on All. The next part can be done several ways. This will assume you're not sure what do to or how to use photoshop. Go up to the menu bar and click on Edit, then scroll down and click on Cut. Your image will disappear and leave a white background. Do not panic!!
Once more up to the top menu bar. Click on Image, then click on Mode, and then click on RGB (see img 3). This is an important step. Don't neglect it :)
 img 3
img 3
There should be a box in the lower right corner of the screen that is called Layers. It'll also have some other tabs called channels and screens. You can ignore the latter two. We just want the Layers one. Click on the Create a new layer icon (see img 4). Or you can go up to the top menu bar and click on Layer, then click on New, click on Layer, then click the Ok button. I recommend the first way of doing it as it takes less time.
 img 4
img 4
----------------
Step 4 - Line Art
Time to get our image back! We just made a new layer. So what you want to do is click on that layer in the layer box. This means that this is the layer we are now editing and messing around with.
Go to the tool bar to the left and click on the paintbucket tool. Now, just left-click anywhere on the image. The new layer you just made should now be filled with black.
Next we go into quick-mask mode. To do so, look just below where it shows the two selected colors. It should have two buttons. The left should have a circle made of dashes and the right one should have another circle made of dashes, but the inside is a different color from the outside of the circle. Click on the right button. This enter us into quickmask mode (see img 5).
 img 5
img 5
While still in the exact same layer, we now either hit ctrl+v or go up to the top menu bar and click on Edit, then scroll down to Paste. You will now have a black box as before, but now you'll have your image back. It will now be as red lines, however (see img 6).
 img 6
img 6
Next, go back to those little dashed circles. We're leaving quickmask mode. Click on the left dashed circle. Now the entire image is solid black, but there should be a bunch of dashed lines everywhere in the shape of your image's lines (see img 7). DO NOT DESELECT. Hit the delete key. You should now see the white background from the layer below. You should also now see your drawing's lines (see img 8). Now you may go up to the top menu bar and click on Select and then click on Deselect.
 img 7
img 7  img 8
img 8
You should now have two layers. One is a solid white layer. The second is a layer that contains only the lines of your drawing. Go to the layers box and right click on the layer with your lines (see img 9). Click on Layer Properties and give that layer a new name. I personally call that layer Line Art. Then click on "Ok".
 img 9
img 9
----------------
Step 4 - Clean it Up
Next we go back to the left tool bar. We're now going to click on the lasso tool. Zoom in on your image so you can actually see stuff better. Use the lasso tool to select all those random stray lines (do a little at a time) (see img 10). Then hit the delete key on your keyboard.
 img 10
This can be very time consuming. And it's the part I hate the most depending on how clean the drawing came out in the first place. It can also take practice and experimenting to see what works fastest or best for you.
----------------
Step 5 - Coloring the Lines
I save this step for after I've already colored the rest of the image. This tutorial is not to explain how to color the rest of the image. So we're fast-forwarding to that being done.
Go to your layer with the Line Art. Make sure you click on the box that says "Lock Transparent Pixels". This is located near the top of the layer box menu (see img 11). What this will do is make sure you only color the lines, and not the rest of the layer.
 img 11
Now just select your colors and go to town painting those lines. See what colors work best for your lines :)
Coloring the lines can make a huge difference in the appearance of the image. As seen in the examples below. It isn't always necessarily better. It's all personal preference on how you want your image to look and what style you're going for.
 uncolored lines
  colored lines
To Tutorials
To Elftown CG Tutorials
|
| Show these comments on your site |
 Stumble!
 img 1
img 1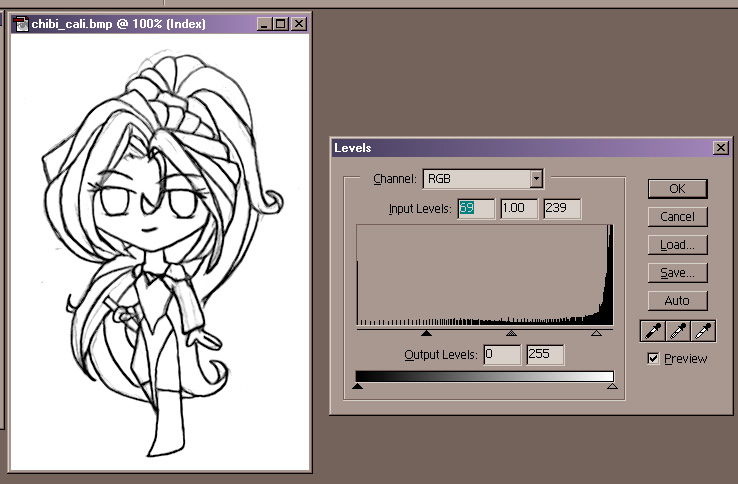 img 2
img 2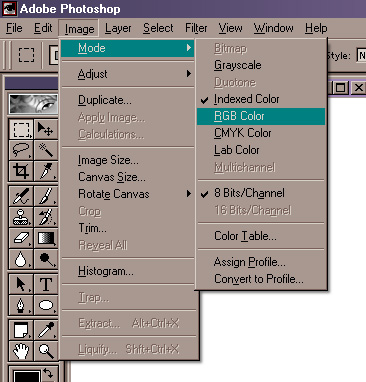 img 3
img 3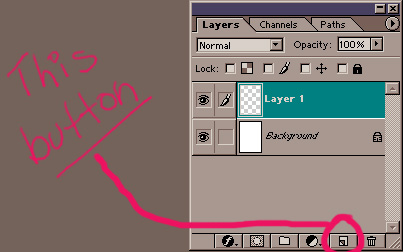 img 4
img 4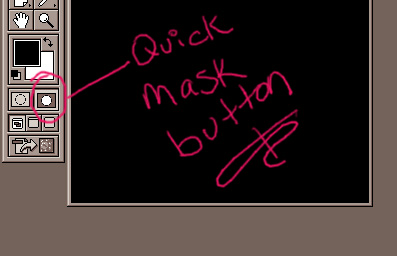 img 5
img 5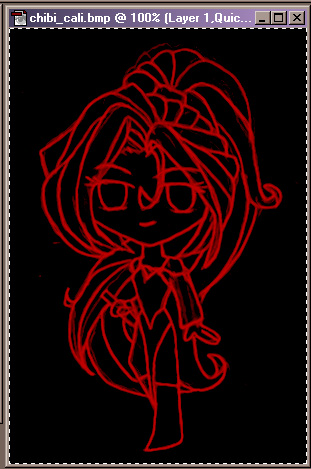 img 6
img 6 img 7
img 7 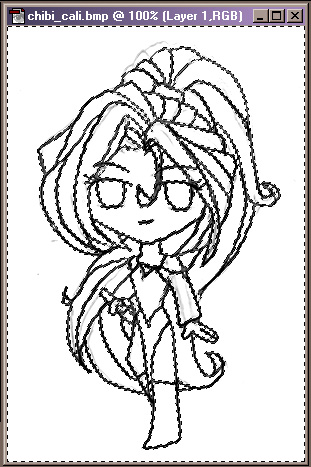 img 8
img 8 img 9
img 9 img 10
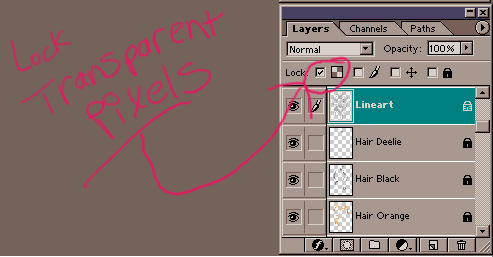 img 11
 uncolored lines
 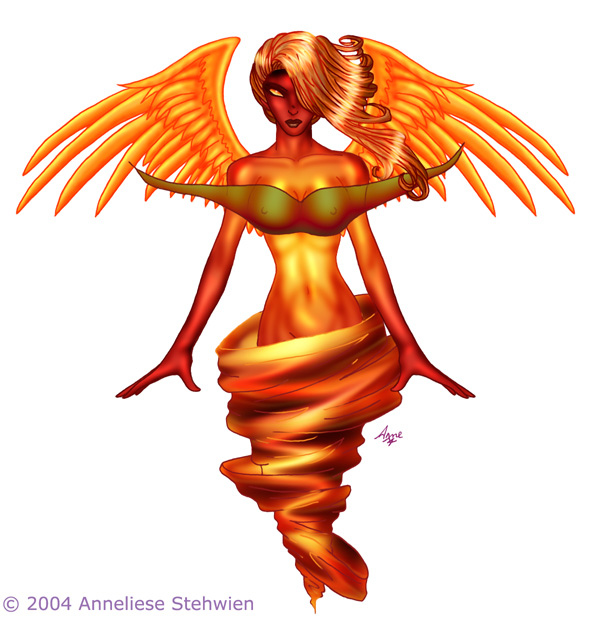 colored lines