Renaissance Costumes
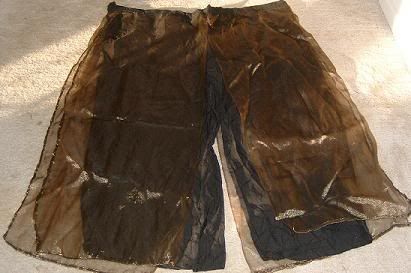
Divided Skirt
Modded Pant Style
 Supplies Needed
2-4yds light weight cloth
2yds contrast cloth, very light/gauze preferred
color matched thread
1-2yds wide ribbon or decorative roping for tie
Step 1: As always get your measurements - waist or hip to top of foot, crotch to top of foot, and waist. Make sure you add your seam allowance to the measurements before you cut, with more allowed if you are using a doubled hem or a french seam, as they tend to use more fabric.
Step 2: Using either a panel skirt pattern or the pattern for a loose fitting pant, cut your base fabric into 4 panels. If using a pant pattern like Kwik Sew 3271, cut the crotch as directed. If you're doing a straight 4 panels as you would for a skirt, measure from your waist to the center of your crotch and mark it on the front panels. Do the same for the rear panels using the measurement from the top of your butt to the center of your crotch. These measurements are generally not the same - no worries - just match the dots marking the crotch center when you pin the fabric together.
Step 3: Pin and stitch the in-seam. Be sure the 4 crotch dots all match up or you may end up with an uncomfortable fit. If you're doing a sleek, fitted look with a stretchy fabric, give yourself the barest seam allowance - about 1/4" - if you want a loose, flowing look, you may want to adjust the dots down about an 1" or so. Just think about where you want that crotch line to sit - like a pair of Wranglers or more like a relaxed fit, your choice. Also, don't forget to finish the seam! If you're using a serger or you have the overcast stitch, easy enough. If not, do a doubled hem or a french seam.
Step 4: Stitch the outer seams shut, and finish them out.
Step 5: Using your waist measurement, lay out and cut your waistband. I made a nice, narrow one, but if you want it to stand out as a design feature or use a contrast fabric, you may want to make it wide. Whatever you decide, cut it double the width with about 1"-2" allowance for seams.
Step 6: Finish the two short edges with a doubled hem.
Step 7: Cut 2-4 panels from your contrast cloth - the number depends on whether or not you want the contrast panels in front and back or just on one side. You can use the same pattern for these as you used for the pants panels, unless they include the crotch curve. Otherwise, you can just cut them as 2 rectangles that are narrower at the top and wider at the bottom. Generally I do 1/4 of my waist measurement plus about an 1" for hemming, then double or triple that for the bottom.
Step 8: Finish the edges of the contrast panels excepting the top edge, which will be sewn into the waist band.
Step 9: Fold the bottom of the back edge of the waistband up and iron it in place. If you can't use a hot iron on your fabric, pin or hemtape it down. Then pin the top edge of the contrast panels in place along the waistband. This is easiest if you fold the waistband in half lengthwise and mark the center, then overlap the front panels across this point. Overlap the back panels on the side edges with the front panels, but not across each other in the back, as that edge will not be sewn shut. Stitch the panels in place.
Step 10: Repeat the lengthwise fold on the edge of the waistband and pin it over the raw edge of the contrast panel - the bottom should match up to the bottom of the back panel. You can either pin it as it sits and stitch it together, or pin it to the pants, starting at the center. Stitch it shut.
Step 10a*: Attach the waistband to the top of the pant. Be sure to pin it from the center working back so that the open edge is directly behind you. Do not sew the open edge shut - that's where the tie goes.
Step 11: Insert the tie into the wasitband. If the pants are fitted, or if you want a specific amount of gather in the waist, you can stitch the tie in place by running a straight stitch across it. I usually don't do this, because I take the ties out for washing.
Step 12: Try the pants on, check the fit and the length. Note the bottom hem or have someone pin it for you. Stitch the bottom hem shut with either a serged stitch or a doubled hem.
Project Notes
I'll be adapting these pants for bellydance soon by inserting elastic in the waist and at the feet. They should make lovely harem pants. I'll post the updated pic in
Bellydance Costumes with a link to these instructions.
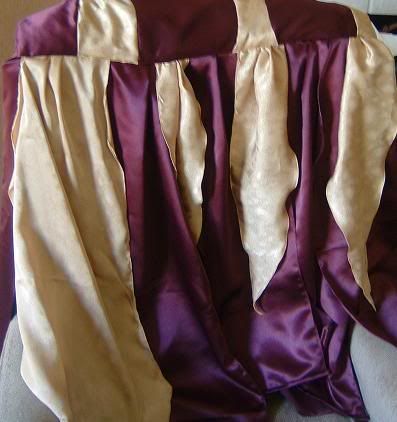
Fairy Petal Skirt
 Supplies Needed
2-4yds light or medium fabric (depending on length, layers)
1 7" zipper OR elastic
color-matched thread
1 hook and eye or snap
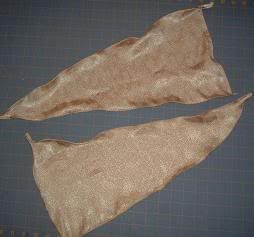
Step 1: Determine the length and style of your fairy skirt - will you have short, dagged edges or long, wide handkerchief pieces, or something in between (or both, if you're of a mind).
Step 2: Measurements! You'll need your waist, your hips, and from your waist or hip to wherever you want the skirt to hang.
Step 3: Cut your petals - see
Roz's Sketches for my pattern examples and specific instructions. My skirt is a layer of the dagged pieces lying over handkerchief style pieces. I used really light fabric in layers.
Step 4: Finish your edges. Since I went with a light fabric, I used a rolled hem foot to finish the edges, but you can serge them shut, do a folded hem, or even use a straight stitch about a 1/4" in and leave the outer edge ragged.
Step 5: Use your waist measurement to cut your waist band. It helps to cut it on the fold so that you only have to stitch one side shut before closing it. If you're using elastic as a closure technique, you'll probably want to double your waist measurement for the band so that it gathers attractively when you place your elastic. As always, the elastic should be cut to a comfortable but secure length for you. I recommend a wide band as it is less likely to roll.
**If you're making a fitted waist band, cut it precisely to your measure, leaving about a 1/4" for hemming in the zipper. You may also want to make the band a standard zipper length so that you don't have to sew the end of the zipper shut.
Step 6: Set the waist band open, right side down. Place your petals evenly along the back of the waist band, right side up. Remember that your modesty is equal to your overlap on the petals! Use pins or hem tape to hold them in place, then stitch them down. Be sure to leave loose petal edges on the back to stitch across when you close the waistband.
Step 7: Fold the top of the waistband over to cover the stitched edge of the petals, then fold the raw edge under and pin it in place. Stitch the waistband shut - try to follow the previous stitch line.
Step 8: Insert your elastic and stitch it down - be sure to overlap it and stitch it horizontally and vertically to hold it in place. Then sew the back seam shut, overlapping the loose petal edges to provide *rear* coverage. OR place your zipper; you can either fold the raw edges of the waistband under or into themselves when you pin the zipper in to finish the edge. Pin the loose petal edges across the back and stitch them in place. Sew down the zipper and check the fit. If it's good, hand stitch a snap or hook and eye at the top of the zipper to keep it shut. Then, you're done!
Project Notes
This skirt was really simple to sew - the hardest part was the petal placement. Just remember to think about how it will hang on you and try not to put too much fabric under your needle at one time. I should have pictures of this up soon, then it will be moved to Renaissance Costumes.
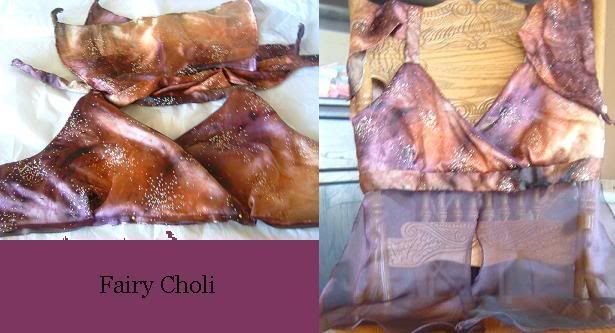
Fairy Choli
 Supplies Needed
1-2yds decorative fabric
1-2yds liner fabric
1-2yds contrast fabric - optional
4 large hook and eyes
Step 1: Find a choli pattern you like or use tissue to draw out a basic bra top. I used Simplicity pattern 4317, with a few changes.
Step 2: Cut your pattern and pin it to the fabric. Be sure you mark dots, gathers, pleats, ect. It makes it a lot easier when you go put the outfit together. If you're making your own design, just place a dot where the fabric should meet up. You generally want a pleat just to the outside of the center of the breast. Be sure to double check your chest and bust measurements before you cut ANYTHING.
Step 3: Cut your fabric. Generally, I cut the liner first and pin it together to make sure it fits. The liner is usually the cheaper, less pretty fabric, so it's best to screw up on it if you're going to screw up at all. Anyway, if the liner fits, cut everything else out. I cut the belt piece on the fold - explanations in step 5.
Step 4: Follow the patter directions for the straps and the main body of the choli.
Step 5: Match the right sides of the belt piece together and stitch it shut, then pull it right side out from the open side edge. Press this piece flat.
Step 6: Fold the bottom of the choli right side to right side, press. Then pin the finished belt piece over the raw edge to cover. Stitch this in place.
Step 7: Finish out all edges of the petals that attach to the choli top.
Step 8: Stitch the petals to the bottom of the belt piece, DO NOT stitch the petal pieces to each other. I know, that's what the pattern calls for, but I think it looks more fae with them wispy.
Step 9: Have someone help you try the top on - if it doesn't fit right, you can take it up in the side seams or in the back. You can also add to it, if need be. Once you're sure it fits, hand stitch the hook and eyes on the back. Be sure you get the very top of the choli and the very bottom of the belt. Don't attach the petals in the back via hook and eye.
Project Notes
This top was really easy to make, though I was dissapointed with the pattern instructions - they make it harder to finish out your edges.
The hardest part of this top was the sleeve bits. My best advice if you try this one is to roll them up tightly and pin them down from the outside so that they don't catch on the raw edge when you stitch the shoulder straps. It took me 3 tries to get it pinned just right, but I managed to avoid catching the edge a single time. Nice, right?
Red Satin Doublet, Poet Sleeve Shirt, and Pants
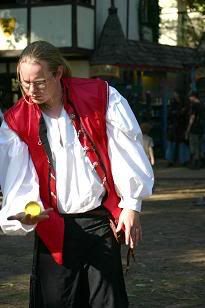 Doublet
This was made using the McCall's pattern M4695. I did take the liberty of changing a few things on it. The alterations are as follows-
Attach decorative ribbon and braid prior to stitching seams closed. This gives a more finished look and keeps the ends from fraying.
Used a light cloth for the outer fabric and lining with a heavy interfacing to make the costume easier to wear in hot weather.
Used solid metal lion's head clasps rather than fabric frogs for a more decorative closure. (Not that it mattered, he wound up wearing it open anyway.)
Pants
I used McCall's pattern M4864 - just the pants. I changed a fair bit on these pants, but I loved the cut of them too much to switch to a more period pattern.
I attached ribbon and silk rope ties at the waist and knees for closure, instead of the buttons. I used a faux suede material instead of the suggested woven materials to give it a more period look, though as I said before, the cut was wrong.
I altered the crotch by lengthening the panels to give the pants a looser look instead of the butt-hugging they were designed for.
I made the waist band wider to accomodate the ties more attractively (another detail you couldn't even see when they were worn . . .).
Yoke Top Poet Sleeve Shirt
This was made using the McCall's pattern M4862. The main alterations were in the sleeves and the hem.
I inserted a ribbon tie closure for the sleeve cuffs, and did not use interfacing to stiffen the linen.
I did not put in the long side openings the pattern suggested so that the shirt would look better tucked in.
I did not use a gather stitch on the shirt panels when attaching the yoke. Instead I did a measured tuck and pin - this meant the gathers were more like pleats, occuring with the frequency and depth I thought would look most flattering.
Empire Waist Dress
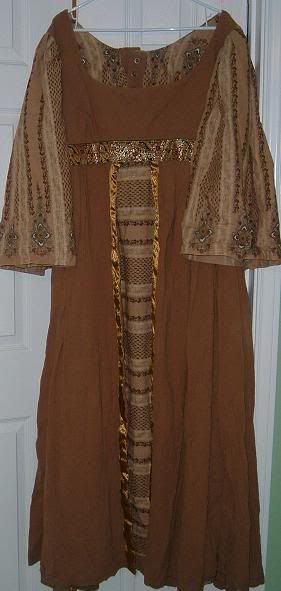
This pattern was made using Simplicity pattern 3812, with some modifications.
I changed the sleeves to a full bell and left off the decorative sleeve gauntlets. The main reason for this was that I wanted to show off the design on my fabric.
The pattern required a zipper closure, but that didn't suit me, so I added a fabric panel to the back and made it a laced bodice closure. This also required reinforcing the bodice fabric to allow for some cleavage-creat
ing umphhh.
I didn't make a full underskirt, seemed like a waste of gorgeous fabric. I did a 2/3 skirt to cover the necessaries while walking and called it done.
I added a lot of notions - ribbons, ribbons, ribbons! You can't go wrong with decorative, embroidered ribbon on a dress like this, especially if you're going for a wealthy look.
Tie Pants and Shrouded Vest
status - finished
Tie Pants
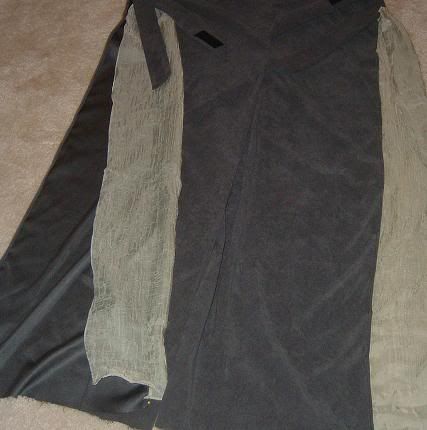
Supplies Needed:
2-3yds light fabric
2-3yds decorative braid or rope
These pants are RIDICULOUSLY easy to make. I used the same pattern from my harem pants Bellydance Costumes.
Step 1: Get your waist, outer leg seam, and inseam measurements. Same advice as before, really.
Step 2: Take any long pants pattern, widen it at the waist by about 3" - 6" on a side. You'll also want to include 1" - 2" extra on top for the tie-guide. This gives the pants a loose billowy look, but before you decide how much to widen by, you need to think about how much skin you want to show. More skin = less fabric.
Step 3: If the pattern calls for stitching only the in-seam shut, you can either reverse the pattern (the method for doing this is a little different for different patterns - but basically you just cut the crotch on the seam with the outer leg seam on the selvage) or cut open the fold.
Step 4: Trace the enlarged pattern on a soft, light cloth - preferably a linen or cotton. (I know I'm contradicting myself, but I used a heavy moleskin to get the look Justin wanted - sort of faux leather hanging heavily off his legs with little air movement but lots of texture). Be sure when you cut the fabric that you leave room for the seams.
Step 5: Stitch the pant legs together at the crotch - reinforce the seam. For this I would suggest a french seam or a straight stitch with a serged edge. Trust me, you don't want unraveling or tearing at the crotch!
Step 6: Finish the edges with - a folded seam, hem tape, a serged edge, or if you want the ragged look, a straight stitch about 1/2" to 1" in, then go back and fray the edge to that stitch.
Step 7: For the tie, fold the top edge over and stitch it shut. Be sure to fold the raw edge under or you'll need to overcast it to keep it from fraying badly. Then thread a piece of rope, decorative braid, or whatever you'd like to use, through the pocket you've made and out the other side. You should, at this point, have a front and back pocket and a front and back tie.
Step 8**: **Optional - Secure the tie in the center by stitching across it vertically.
Step 9**: **Optional - I added to fabric panels to the front leg wraps that match the shrouding fabric for the vest. All this requires is determining how big you want them - I went with 8" wide, and how long they need to be. Cut a rectangle of fabric to those dimensions, zip up the sides (see project notes) gather the top, and attach.
Project Notes
Instead of steps 7 and 8 I made wide fabric ties on the front and attached more of that good old industrial strength velcro. The ties overlap in the back and secure shut that way, tight enough to hold the back in place. This was per my husband's request.
I used the hem roller foot I got for the wing fabric to zip up the sides of the sheer panels. It is AMAZINGLY easy to use. All you need to do is double fold about 1"-2" at the top and press it in with a hot iron. Make sure your needle is positioned correctly - I had to move mine all the way to the right to get it to work. Place the pressed edge under the needle and lower the foot - stitch about 1/4" to 1/2" in. Lower the needle into the fabric and leave it in while you lift the foot. Take the folded edge and hook it into the lip in the rolled hem foot and lower it back down. Grab your fabric about 6" out from the machine and hold it lightly, lifting it a few inches above the machine. Start stitching again, letting the fabric slide through your fingers. You should see a tunnel or half circle formed by the fabric where it enters the lip of the foot. If it goes to far to the left it will bunch and loose the roll. Too far to the right, and it will slip off the lip entirely. I call it watching for the tunnel of DOOM. To much Invader Zim, I guess.
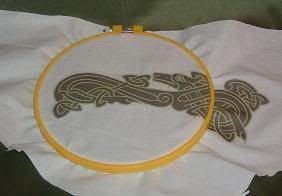
This is the embroidery pattern, nice and shiny in my hoop. And color coded to boot! I'll take another set of pics once I've finished the embroidery.
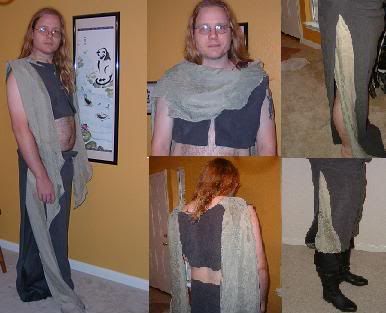
Shrouded Vest
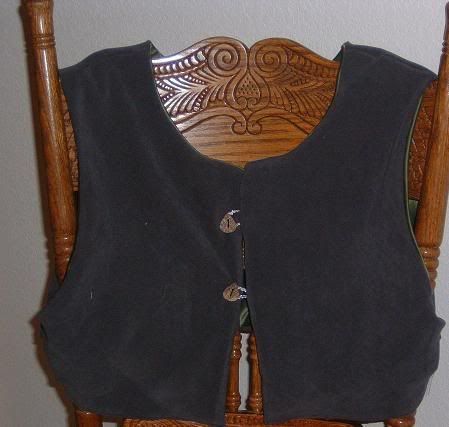
Supplies Needed
1-2yds fabric for vest
1-2yds fabric for lining
2-4yds fabric for shrouding
2-5 buttons
6 hook and eyes
I used Simplicity pattern 3478 (yes, I know it's a women's top) as the base for the pattern sketches. The alterations are as follows:
I left off the sleeves and the hem tape.
Added a lining. This means I put the lining together, then the outside, then stitched the two together - right sides facing, leaving the bottom hem open to pull the fabric through (be sure you leave the under arms open too or you won't be able to pull it right side out!); then I stitched the bottom hem up by folding the bottom fabric over the raw edge of the lining.
I left off the darts, which meant I had to alter the sleeve holes, but that just meant rounding it out a bit.
I had to resize the whole thing to fit my hubby . . .
I put the loops in BEFORE I sewed that side shut to that the raw rope edges were inside the vest.
I used a hook and eye at the top of the vest to hold it shut because a button looked funny there.
Project Notes
The shrouds are just 2 pieces of very lighty, gauzy fabric cut to about the height of my husband, with 3 hooks sewn about a foot in to attach to eyes on the shoulder seams of the vest - one shroud piece to each shoulder. These are worn crossed on the chest and hanging loose in the back, like a cape or wrap.
The shrouding and attachments are done - I should have an updated picture up soon, though I have yet to finish the embroidery.
DISCLAIMER
If anyone would like, I can scan some of my altered pattern images in so that you can print them, trace them, and make this piece for yourself. For the record, I can't scan the actual pattern because that would violate copyright laws, and I have no intention of doing that. However, my artistic variations are of course, open source and I am happy to share ^_^.
Costumes and Crafts
 Stumble!