
 ECGTD Line to Art
Return to Elftown CG Tutorials
ECGTD Line to Art
Return to Elftown CG Tutorials.
Return to ECGT Adobe Photoshop.
Return to ECGT Deiscorides Photoshop Tutorials.
Click on link to view full image.
Part A - Creating 1/4th of a Celtic Knot and Scanning It:
Here is what we are going to do. We are going to draw a raw sktech, scan it, clean it up, mirror it, and style it. Sounds easy doesn't it? Well, it is. It just takes time, patience, and practice. Now you can either draw your own Celtic Knot or you can grab the one I drew for you and use it as you follow along with the tutorial. But please, read Part A anyway. As you can see, my knot doesn't look like a knot does it? Well, I won't let a small thing like that bother me when I have the power of Photoshop at my finger tips. I also want to let you know that some of the things I will be showing you here are in a bit of a round-about way, only so that I can show more than one way to do a certain task.
 <URL:stuff/Deiscorides_Tutorial_Line2Art_Large_00a.jpg>
Use the link below to grab this image and edit.
 <URL:stuff/Deiscorides_Tutorial_Line2Art_Large_00.bmp>
Step 1:
<URL:stuff/Deiscorides_Tutorial_Line2Art_Large_00.bmp>
Step 1:
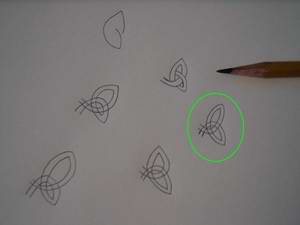
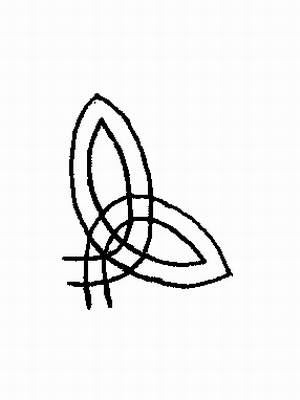
Draw 1/4th of a knot like I have above. Then place it in your scanner. Set the scan so that is saves the image as a Black and White Drawing. Your scanner and scanning program will look very different from mine, but there should be some sort of option within it to save your scans as black and white images. Gray scale images will not work. It must be black and white only, just two colours
 <URL:stuff/Deiscorides_Tutorial_Line2Art_Large_01.jpg>
Steps 2 and 3:
<URL:stuff/Deiscorides_Tutorial_Line2Art_Large_01.jpg>
Steps 2 and 3:
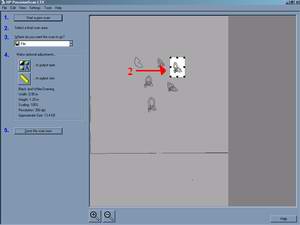
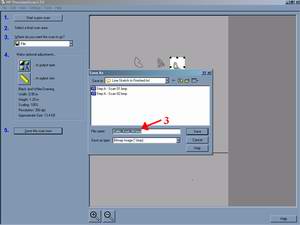
Now after you preview scan, highlight only the part of the image you want scanned and save. If your scanner and program can not do this then scan the whole thing and crop the image down to only what we will be working with. Save your scan as a bitmap and name it as "Celtic_Knot_0
0.bmp".
<URL:stuff/Deiscorides_Tutorial_Line2Art_Large_02.jpg>
<URL:stuff/Deiscorides_Tutorial_Line2Art_Large_03.jpg>
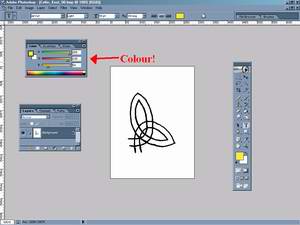
Part B - Converting BitMap to RGB Format:
[Save your work to a new file!]
Step 1, 2, and 3:
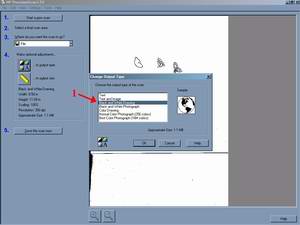
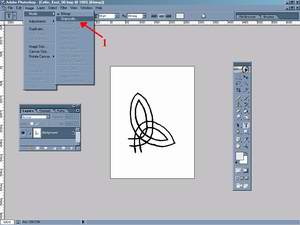
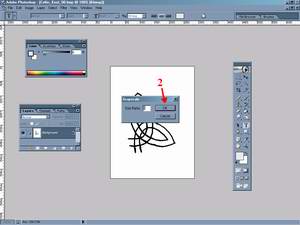
Open your save image in Photoshop. You may notice that you do not have the use of your colours at this moment. If that is true then the file mode needs to be converted to RGB colour values. To do this click on, "Image" at the top of the screen. On its menu click on, "Mode". On that menu, click on, "Grayscale". Click "OK" in the tiny window that pops up and asks you for the "Size Ratio". The default is 1.
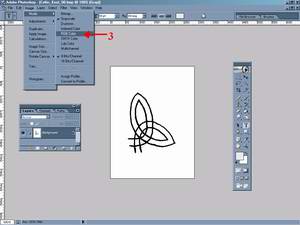
Now you must convert your grayscale image into an RGB. Click on, "Image" again and then "Mode" again. This time click on the now lit-up RGB Color. That is all you need to do to get use of your colours.
<URL:stuff/Deiscorides_Tutorial_Line2Art_Large_04.jpg>
<URL:stuff/Deiscorides_Tutorial_Line2Art_Large_05.jpg>
<URL:stuff/Deiscorides_Tutorial_Line2Art_Large_06.jpg>
<URL:stuff/Deiscorides_Tutorial_Line2Art_Large_07.jpg>
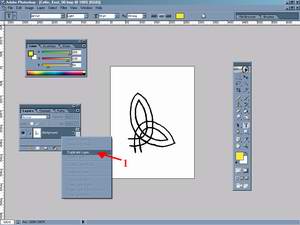
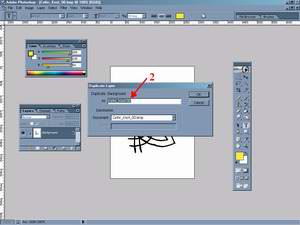
Part C - Duplicating Layers:
[Save your work to a new file!]
Steps 1 and 2:
This is easy. In your Layers window, right-click on your "Background" layer and select the only option that is lit-up, "Duplicate Layer". Then give it a name like, "Celtic Knot 00".
<URL:stuff/Deiscorides_Tutorial_Line2Art_Large_08.jpg>
<URL:stuff/Deiscorides_Tutorial_Line2Art_Large_09.jpg>
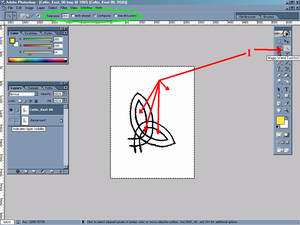
Part D - Removing the background:
[Save your work to a new file!]
Steps 1 and 2:
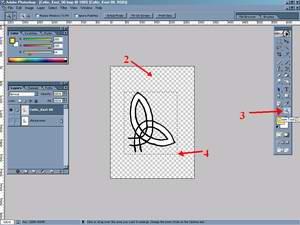
Click on the Magic Wand Tool or press "W" on your keyboard to select it. Pay special attention to the vaules I have inside the green circle in the picture below. If yours are different in some way then adjust them so they are like mine. The tolerance needs to be 254, the anti-aliased box needs to be turned off, Contiguous needs to be on, and Use All Layers needs to be off. As shown in the picture below for Step 1 select the areas that are the background. After you click on your first piece of the background you will need to hold down the Ctrl button on your keyboard so you may select the next piece of background and the rest after that. If you make a mistake simply use Undo to correct it. Take note that I have unchecked the tiny "eye" near the "Background" layer in the Layer window. This hides the layer that is under the one you are working on. Once you have selected all the peices of the background like I have press the "Delete" key on your keyboard to erase them.
<URL:stuff/Deiscorides_Tutorial_Line2Art_Large_10.jpg>
Steps 3 and 4:
Once that is complete you should see a great deal of checkers behind your image. Those areas are completely void of any colour. If you still see white then make sure the layer under the one you are working on is hidden.
Use the Zoom Tool by clicking on it or pressing "Z" on your keyboard. Drag a rectagle around your image so that only the image is inside it. This will zoom in that area only for you to examine and see.
<URL:stuff/Deiscorides_Tutorial_Line2Art_Large_11.jpg>
Step 5:
Select the Magic Eraser Tool by clicking on it or pressing "Shift+E" on your keyboard until the symbol for the Magic Eraser Tool pops-up.. Like the Magic Wand Tool you need to look at the settings for this tool inside the green circle I have drawn and make sure they are the same as mine in the picture below. After that you need to click on the remaining white parts of the image until they are all erased.
<URL:stuff/Deiscorides_Tutorial_Line2Art_Large_12.jpg>
Part E - Cleaning Lines:
[Save your work to a new file!]
Step 1:
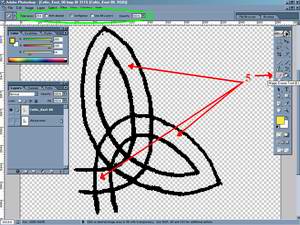
Select the Eraser Tool by clickinong on it or by pressing "E" or "Shift+E" until it pops-up. Use the eraser to smooth out the line on the insides and to erase any of the over-lapping lines that would normally be under the other parts of the knot, as shown in the picture below.
<URL:stuff/Deiscorides_Tutorial_Line2Art_Large_13.jpg>
Steps 2 and 3:
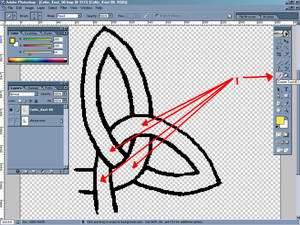
Click on the Pencil Tool or press "B" or "Shift+B" until it pops-up. Select a color like red and draw two lines close to the edges of the knot like I have in the picture below. These lines are where the knot will be fitted together when it is copied and mirrored. Erase everything that is hanging over the red lines so that it has two flat sides.
<URL:stuff/Deiscorides_Tutorial_Line2Art_Large_14.jpg>
Part F - Layering:
[Save your work to a new file!]
Step 1:
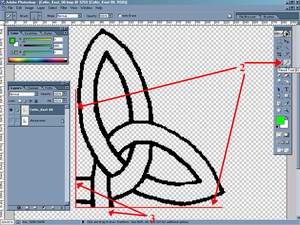
Now to cut up your image and put the pieces into layers. Basically, we are going to lift the knot out of the lines you've drawn. The first thing we are going to do is use the Paint Bucket Tool. Click on it or press "G" or "Shift+G" until it pops-up. Again, check the settings for this tool in the green circle I drew at the top of the picture below. Select a colour like the bright green I am using and paint the insides of your knot. Take care not to colour inside the loops and only colour in the "rope" of the knot.
<URL:stuff/Deiscorides_Tutorial_Line2Art_Large_15.jpg>
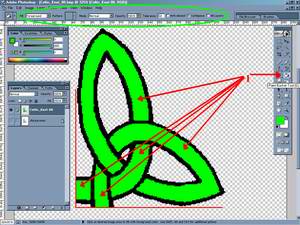
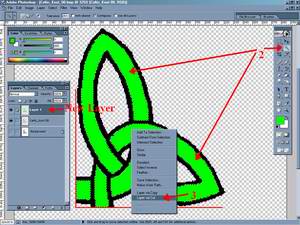
Steps 2 and 3:
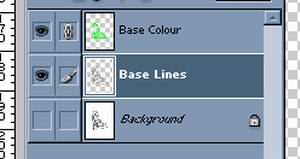
Now use the Magic Wand Tool to select all of those bright green areas you just made. Take care not to select anything else or the black lines. Once you have done that, right click on the bright green pieces you have selected and then select, "Layer Via Cut" from the menu that pops up. You will notice that a new layer is created in the Layer window. You may now rename your layers to reflect what you have done, like I have. This new layer contains only the coloured areas of your image while the lines are below it.
<URL:stuff/Deiscorides_Tutorial_Line2Art_Large_16.jpg>
<URL:stuff/Deiscorides_Tutorial_Line2Art_Large_17.jpg>
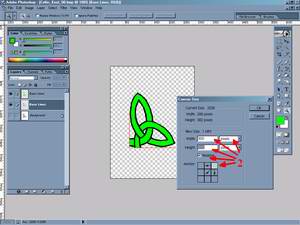
Part G - Resizing the Canvas:
[Save your work to a new file!]
Steps 1 and 2:
Now we need more room to work on our image. Click on "Image" at the top of the screen, and then on "Canvas Size". In the small window labeled "Canvas Size" adjust the settings so that they reflect the ones I have in the picture below. You are basically adding to your canvas. Make sure that the numbers are in pixels and that the correct anchor is being used. The anchor allows you to add only in one direction for each axis instead of the default double direction for each axis. When you are done, click on "OK". Your image's canvas should be much larger now. Adjust your zoom to what best suits you.
<URL:stuff/Deiscorides_Tutorial_Line2Art_Large_18.jpg>
<URL:stuff/Deiscorides_Tutorial_Line2Art_Large_19.jpg>
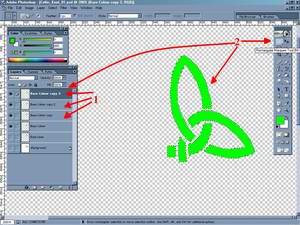
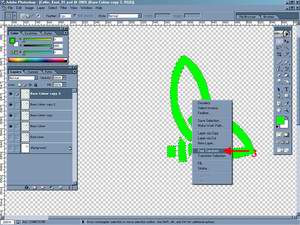
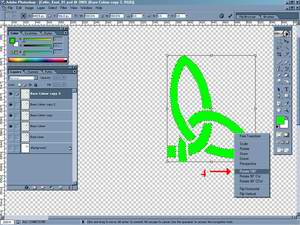
Part H - Mirroring and Rotating:
[Save your work to a new file!]
Steps 1-4:
For this you will need 3 duplicates of your bright green layer(mine is named "Base Colour"). After you have done that make sure the last or top layer you have made is highlighted. Click on it again but this time hold down the Ctrl key on your keyboard. This action will select all the content in that one layer. Now select the Rectangular Marquee Tool by clicking on it or pressing "M". Right-click on the area that is now selected. In the menu that pops-up select, "Free Transform". Right-click again and select "Rotat 180". You should see one of the copies rotate suddenly. Press "Enter" on your keyboard when you are done. Now to grab and move this layer you can press Ctrl and then click on a part of the image and drag it where you want it. Select the next layer that contains a copy. Repeat these steps to the other 2 copies of this image. You will have to use the "Rotate 90 CW" and "Rotate 90 CCW" as well. You will be creating four courners and fitting them together. You may need to use the eraser and the pencil with black colour to help you fit the pieces together like I have in the pictures below.
<URL:stuff/Deiscorides_Tutorial_Line2Art_Large_20.jpg>
<URL:stuff/Deiscorides_Tutorial_Line2Art_Large_21.jpg>
<URL:stuff/Deiscorides_Tutorial_Line2Art_Large_22.jpg>
<URL:stuff/Deiscorides_Tutorial_Line2Art_Large_23.jpg>
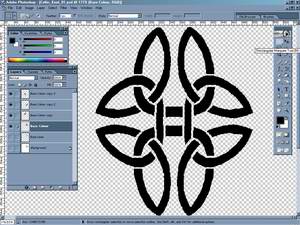
Once you have finished fitting these pieces together you need to select the top most layer of the four. Press, "Ctrl+E" on your keyboard and you will merge that layer down onto the layer below it. You should do this for the 3 copies you have made. When you are done there should be only the original "Base Colour" layer left in addition to the "Base Lines" and "Background" layers.
Part I - Styling:
[Save your work to a new file!]
Steps 1 and 2:
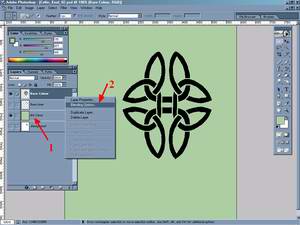
Finally, the fun part! <-(^_^)-> First thing you need to do is to create a new blank layer. To do that look at the Layer window. At its bottom there is a small trash can and next to the left of that trash can there is an icon of two tiny windows, one ontop of the other. Click on that and a new blank layer will be created. Rename that layer "BG" and click on it and drag it somewhere below your "Base Colour" layer. Now select a suitable background colour like I have and use the Paint Bucket Tool to colour that entire new layer. Incidently, the colours I used on the very final image(which there is no screen shot of) has its background colour vaules as R:173 G:207 B:165 Then click on the "Base Layer" to highlight it and then Right-click on it. In the menu that pops-up select "Blending Options". A small window will pop-up named "Layer Style".
<URL:stuff/Deiscorides_Tutorial_Line2Art_Large_24.jpg>
Step 3:
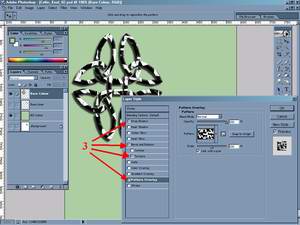
In this "Layer Style" window you can do many things to affect your image. Play around with the setting yourself or just click on and checkbox the ones I have shown in the picture below. Yours will look different as you do not have the same set of textures and patterns that I have to use. You can go to the ECGTD Patterns and Textures tutorial and learn how to make your own if you want(which is much easier than going through this tutorial). For now just use what you have and click on "OK" when you are done playing. Now you must resize your canvas so that the edges of the canvas are just barely touching the image you've created. This can be very tricky and you will have to use the Undo command a great deal. lol I save the image as a BMP file and use MS Paint to crop things down with it instead. There are other ways to do it, but I'm too lazy to learn myself. ;P
<URL:stuff/Deiscorides_Tutorial_Line2Art_Large_25.jpg>
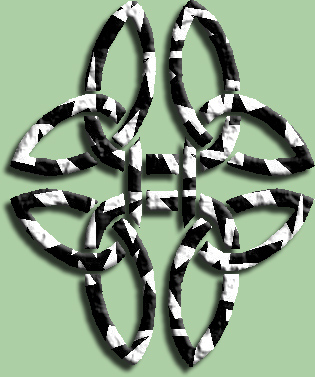
Part J - Finished!
[Save your work to a new file!]
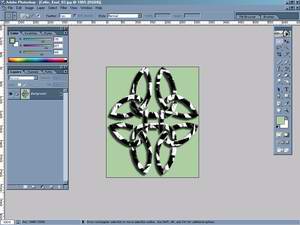
Here is what the finished images look like:
<URL:stuff/Deiscorides_Tutorial_Line2Art_Large_26.jpg>
Final image ready for use on Elfhouse descriptions:
Return to Elftown CG Tutorials.
Return to ECGT Adobe Photoshop.
Return to ECGT Deiscorides Photoshop Tutorials.

http://www.pro-counter.com/signup.htm - get your own site-counter.
| Show these comments on your site |
 Stumble!