Wiki:
Page name: House Navigation [Logged in view] [RSS]
Version: 1
2007-09-30 21:26:55
Last author: Hedda
Owner: Hedda
# of watchers: 3
Fans: 0
D20: 20
Bookmark and Share
<img:stuff/ETHNB.jpg>


<img:img/drawing/80746_1099411827.jpg>


Guide to the House Navigation Buttons


<img:stuff/hn1.jpg>


Other guides:
- Help
- Elftown Guides
- Navigation
- Wiki guide
- Forum guide

<img:img/drawing/80746_1099411827.jpg>


Table of contents

House buttons:
[#Presentation] - [#Show your email / Hide your email]
[#Diary]
[#Guestbook]
[#Member Polls]
[#Last postings]
[#Relations]
[#Member stats]

Changing/removing your presentation:
[#Change personal data] - [#Private Information]
[#Coloured text]
[#Upload photo and drawing]
[#Putting an image in your description]
[#Upload a folder of images]
[#Badges]
[#Exporting Your House and Diary]
[#Member Privileges]

Watching a house:
[#Watching or stop watching a house]
[#Reports and secret comments] - Navigation#bookmarks

Messaging:
[#Messaging]
[#Hidden flirts]
[#Scheduled messages]
[#Blocking or unblocking a member]
[#About emotions]

Other:
[#Latest appearances in photo albums]
[#Deleting yourself from Elftown]

What about everything I see on the right side? See Navigation#Right status bar

Note: Click the link and you will be taken to that part of the wiki.

<img:img/drawing/80746_1099411827.jpg>


<img:stuff/hn2.jpg>

Your Presentation - This button refreshes your presentation.
It contains your own information that other members of Elftown are allowed to see. Of course, you can edit your information - even your alias!
And your presentation thus shows this text to you:
'This is your own house and all the data other members can read about you.'


Example: <img400*0:stuff/HN2.jpg>

Creation date
The date the member created his/her presentation can be found beneath the username. Which looks like this:
'Member [#number] created: 2002-02-07 00:08:04'

Simple url
Every house has an Elftown url. If you never changed your username, the url will contain your name.
If however you did change it or it contains a space, it will be your membernumber instead.


<img:knapp/hideyouremail.gif>   <img:knapp/showyouremail.gif>

When you submit an email address in your personal data, you will see a button on your presentation.
When you set your email address to be hidden for other members, the button will say 'Show your email for others'.
If your email address is viewable for other members, the button will show 'Hide your email'.
These settings can also be changed in 'Change personal data'.

If you didn't fill in any email address, you won't see a button.


Was last seen
When you refresh your presentation, it tells you how much time past since your last refresh and it tells other members when you were last logged in and active.

If you want to see how long ago another member was logged in/on, go to that members house. There you will see a text below the username:
'Was last seen x seconds/minutes/hours/days ago.'
If the member just logged out it will say:
'Was last seen x seconds/minutes ago. (Logged out)'
That will disappear an hour after the log out.

If a member was banned there will be an additional text behind the 'last seen' line:
(This is a banned member! The last seen time only describes when the member tried to log in the last time, not when the member was actually able to get into the site. If you think that someone was able to log into a banned account, then you're wrong - Don't report it!)
Example: <img600*0:stuff/HN3.jpg>

<img:img/drawing/80746_1099411827.jpg>


<img:stuff/hn4.jpg>

Diary - This button goes to your diary, where you can post entries about your day or things like that.

When you write an entry, you have four options of submitting it:
-Public diary entry
-Friends only diary entry (All your friends will be notified!)
-Friends only diary entry (Only watching friends will be notified!)
-Personal secret diary entry

<img:stuff/HN4.jpg>

When you choose the public option, all members can read your entry. Members who are watching your house will be notified.
A friends only entry can only be read by people with whom you have a relation.
You can choose to notify all your friends, or only those who are also watching your house.
A personal secret entry can only be read by you.


<img:knapp/submitdiary1.gif>
After choosing how you would like to submit it, you can press 'Submit'.
When you want to edit a diary-entry you submitted, you edit it in the white field and press 'Submit' again. No notifications are sent for edits.


<img:deletebutton.gif>
To delete a diary entry, press delete.


<img:startdiaryexport2.gif>
You can also export your diary, which means non-members of Elftown can read your entries. How to do this is explained right there in the link called 'Help about exporting'.
When you export your diary, your presentation will be exported too.


<img:knapp/viewolderdiary1.gif>
Last but not least: the most recent diary-entry is the one on the top of the page.
Older ones will be placed underneath.
When a member has made a lot of diary entries, you can look through them by pressing 'View older diary entry'

<img:img/drawing/80746_1099411827.jpg>


<img:stuff/hn3.jpg>

Guestbook - This button goes to your guestbook, where other members can leave you little notes.
Guestbookmessages are public messages that everyone can read and reply to, but only you are notified of new guestbookmessages in your guestbook of course.
The notification doesn't show how many guestbookmessages you received, so make sure you didn't get more than one at once.


<img:deletebutton.gif>
If you do not like a certain guestbookmessage, you can delete it.

View Comments
When you see that there are a lot of comments to a guestbookmessage, you can click 'View Comments' and be shown an overview of all.

<img:knapp/submitguestbook1.gif>
To reply to a guestbookmessage, you can write your answer in the white field and press submit. The message will be delivered as a guestbookmessage in the guestbook of the one you replied to.


<img:knapp/guestbookpm.gif>
If you do not wish for others to be able to read your reply, you can send your reply as a private message to the member.
Your message will be received in the members inbox.


<img:knapp/readolderguestbook1.gif>
To read older guestbookmessage you can look back through the pages by pressing 'Read older guestbook messages'.

<img:img/drawing/80746_1099411827.jpg>


<img:stuff/memberpolls.jpg>

Member polls - Here you can create and view your poll(s).
This button is also shown in other members houses: you can view their polls and vote, if they have one.

To create a poll:
- Write your poll question in the box labeled "New poll question"
- Write the answer choices in the "Newline separated list of answers" box. Press enter after each answer, so that each answer is on a new line.
Elftown will automatically add the letters a/b/c before each entry, so you don't need to add that.


<img:knapp/submitpoll.gif>
Press 'Submit poll' when you're done. Now the poll has been created, but not yet activated.
If you want to edit the text, you can do that and press 'Submit poll' again.


<img:knapp/activatepoll.gif>
Click on the 'Activate this poll' button and other Elftowners will be able to cast their vote!

If you wish to advertise your poll, you can do it in the advertisement forum or write a note about it in your mood or description.
If you want people to find your poll easily you can link to it by writing <poll:(poll number)>, for example <poll:1664>. You can find the poll number on the poll page, right before the poll's title.


<img:knapp/submit_answer.gif>
To vote in a poll you select your choice and press 'Submit answer.

To comment on a poll you write in the white field below it and press <img:knapp/fleche2.gif>


<img:knapp/notepollchanged1.gif>
If you have changed the question or an answer in the poll you can press this button so that viewers can see the poll has been changed.
Especially useful if certain members already voted and your change might influence their vote.


<img:knapp/inactivepoll.gif>
If you want your poll to become invisible to other members again, you can make your poll inactive.
You will still be able to see your poll and the votes.


<img:knapp/deletepoll.gif>
Press this button if you want to get rid of your poll completely.


<img:img/drawing/80746_1099411827.jpg>


<img:stuff/LastPostings.jpg>

View your last postings/View last postings - When clicking this button you can see what last postings you have made in a public forum. You can also press this button on other members houses and see what last postings they made in a public forum.

<img:img/drawing/80746_1099411827.jpg>


<img:stuff/Norelations.jpg> <img:stuff/YourRelations.jpg>
<img:stuff/MemberNoRelations.jpg> <img:stuff/MemberRelations.jpg>

Relations - By clicking this button you can see whom you have a relation with.
You can also press this button on other members houses and see what relations they have.


<img:knapp/suggestrelation1.gif>
To request a relation you have to have sent and received a message to/from that member first. After that has happened you go to the members house, scroll down and you'll see an area that says:
'Type of relation:' and 'Own name of relation'
This means that you can either choose the types of relations given, or make one up yourself.
The types of relations given are:
-family
-friend
-lover
-enemy
-cousin

<img:stuff/HN5.jpg>

If you have chosen a relation name click 'Suggest that you should start a relation'.
<img:stuff/relationrequesting.jpg>


Accepting or denying a relation
When you know someone has sent you a relation request and you want to accept it, you go to your house and scroll down the right status bar.
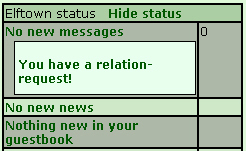
In the middle you will see a notification that says:
'You have a relation request!'
<img:stuff/relationsrequest.jpg> <img:stuff/relationrequest2.jpg>

If you click it you will be taken to a page where you can accept or decline the relation:

<img:stuff/acceptrelation.jpg>

If you scroll down before doing this, you will be able to view the house (in case you forgot who this member is).

If you choose to deny the relationrequest the member will not be notified, except of course that you don't appear in the relationlist.


<img:knapp/suggestchangerelation1.gif>
If after accepting you are not happy with the name, you can suggest it to be changed by going to the same field and filling in a new name. Then press 'Suggest that the relation should be changed'.

Changing the order of your friends
All the relations you have will appear in the right status bar. You can change the order in which they appear.
Go to your list of relations and you will see a link on the top of the table saying 'Change order for "Online friends".
When you click it you will be taken to the page where you can change the order in which your friends appear.
Note: The order you create will only be shown to you. Other members will keep seeing your relation list in alphabetical order.


<img:knapp/friendsordersubmit.gif>
After 'New position:' you fill in the position you would like this member to be in and press 'Submit'.


<img:knapp/putfirst.gif>
If you want a certain member to be number 1 in your list you can simply press 'Put First'.


Relation status
When you have a relation with someone, you can see when they are online.
Their name will appear like this:
- [Hedda]

When a member has not been idle for 10 minutes, a question mark will appear.
? [Hedda]

When a member has logged out, a star will appear.
* [Hedda]

Depending on the personal settings of the member, Elftown may log the member out after a certain amount of inactivity (5 minutes, 30 minutes, 2 hours, 24 hours, 1 week or 1 month).


<img:knapp/endrelation.gif>
To end a relation with someone, you go to your list of relations. Behind every member name you'll see the relation name and then a button that says 'End relation'.
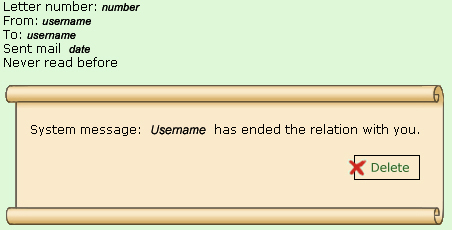
When you end a relation an automatic message will be sent to that member:

<img:stuff/relationendmessage.jpg>
If you delete it from your 'sent messages' before the receiver reads it, it will be removed from their inbox. Of course they will find out at some point that you are not in their relationlist anymore.

And you will be taken to the members house, where you will see this line at the top:
<img:stuff/relationending.jpg>

<img:img/drawing/80746_1099411827.jpg>


<img:stuff/MemberStat.jpg>

Member statistics - This button will show the following statistics of yourself or the relation you have requested the stats of:

Statistics about [Deleted user]
Messages written: x
Messages received: x
Blog entries written: x
Postings (including private ones) written: x
Polls answered: x
Private polls created: x
Number of friends: x

Note: You can not see stats of members you do not have a relation with.

<img:img/drawing/80746_1099411827.jpg>


<img:knapp/changepersonaldata.gif>

Change personal data - Everything on your house can be changed, even your username and password. Click the button and you will be directed to the page where you can edit your presentation.
You can also change your picture here, but there is a shorter/easier way to do that. This will be described in [#Upload photo and drawing].

You only need a username and password to be a part of ET. The other information is optional. But remember the golden rule of the internet: What you write can be viewed by anyone-be careful what you reveal about yourself.

Username: Your alias or handle. You can change this at your leisure.

Password: Choose something you will remember, and retype it to confirm.
Common passwords are forbidden, because they are easy to hack into.

Email: You can put your email in your house so you get ET updates, but you have the option to hide have your emailaddress.

Should ET send you an email?: When you're logged out, do you want ET to notify you when you receive a message? Choose yes or no.

Time before automatically being logged out: If you leave the computer, or have a period of "idleness," how long should ET wait before logging you out?

Fontsize to use: Choose one. It's your eyes we're talking about here.

Stylesheet to use: As a newbie, I highly suggest index.css until you are very comfortable with ET. Then you can start experimenting.
A stylesheet can for instance change the colour-scheme and buttons.

Name: Your REAL name. Leave blank if you do not want to disclose your REAL name.

Upload a new photo or drawing: Click on that text to upload a photo or drawing from your computer to display in your house. Images must abide by the Uploading Art Rules.

Elftown work: What kind of work do you want to do? Inspectors report bugs (things that don't work) to higher authorities, like [Hedda], and Building workers make components for ET, like buttons or banners.

Description: Tell us about yourself.
Don't write about you as a roll playing character, but tell us about the real you: Your hopes and dreams, what you want from life and why you're on Elftown.

Year, month and day of birth: You can enter the month, day, and/or year you were born. You can choose to fill out none, one, two, or all three.
If you fill out all three, Elftown will automatically keep track of your age and sends a systemmessage to your friends, as well as adding you on the bottom of Mainstreet.

Please enter the correct information (i.e. don't say you were born on Feb 31, 1867), or don't enter anything at all.

Age: Enter a number. Once again, please be honest, or leave it blank.

Gender: Choose one. Are you male, female, or both?

Fantasy race personality: Read the descriptions and choose one.

Select Position on World Map: Where do you live in the world? Use this button: <img:knapp/select_pos.gif>
You can simply click at a spot on the map.
You can also copy the coordinates from someone else, paste them in the white field and press <img:knapp/uselatlong.gif>

Place of living: Where do you live? Select a country.

Town: More specifically, where do you live?

Known languages: Select as many as are applicable, but be TRUTHFUL!

Elfwood artist/writer: Choose yes or no.

URLs: Where you can link to your Elfwood galleries (Art or Library). Also, your homepage, weblog and favourite URL

ICQ: If you have an ICQ number, enter it here if you want to chat with people

Elftown crew: Do you want to be part of Elftown crew? If you check yes, you may be asked to do something. If you decide to become part of the ET crew, you will be able to upload images and etc (like stylesheets) to a tech page (Navigation#Tech).

The rest I hope is self-explanatory. Check as many or as little as you want.

Civil status: Choose what you are.

Sexual preference: Choose what you are.

Body shape: Choose what you are.

Height: Enter a full number (no decimals) in CENTIMETERS.

Private Information: Here you can put private information that you only want your friends to see. Like your address, phone number and passwords to your friends only pages.

After you're done changing your house scroll all the way down and press 'Change personal data'.

<img:img/drawing/80746_1099411827.jpg>


Coloured text

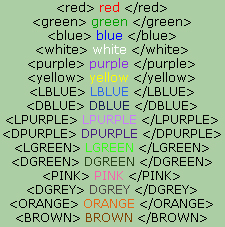
You can not create text colours in your house if you have not donated money to Elftown. See pseudo html for what you can have.

You can earn the right to use pseudo HTML that makes texts coloured by becoming one of Elftown's Official Donors.
Colours you could then use would be:

<img:stuff/ColouredText.jpg>

Text colours in wikis are impossible.

<img:img/drawing/80746_1099411827.jpg>


Upload photo and drawing


Your presentation has two slots for images: One slot for a photo and one for a drawing. Both have the option to add a little description.

<img:knapp/change.gif>
- Change image description
Your picture can have a description. Fill in the white field and press 'Change!'.
If you want to edit or delete the current description, you can also use this field to do so and press 'Change!'.


- Upload a new (or delete current) photo
Upload a picture
If you want to upload a picture, click this link and you will be taken to a page where you can browse through your computer and upload a picture to Elftown.
You can also add a description here.
If you have browsed for an image and added a description to your choosing (you can also leave it empty) you can click 'Upload new picture'.


<img:knapp/upload_new_image.gif>
Upload a new picture
If you want to upload a new picture you follow the same procedure.


<img:knapp/use_old_image.gif>
Old uploaded pictures are saved in your picture-history list. You can choose to put them on your house again by clicking 'Use old image'. It will also add the description you put with it, if any.


Removing a picture
If you want to remove the picture without adding a new one you can click the link again. This time you press 'Upload new picture' without browsing for an image or adding a description. Old pictures are still in your picture-history list for you to see, but not in your picture-slot for other members to see.


<img:knapp/deleteimage.gif>
Deleting pictures from the history list
If you want to clear your picture-history list you can press 'Delete image' for each picture you want deleted from the list.


<img:img/drawing/80746_1099411827.jpg>


Putting an image in your description


To put a picture in your description take the following actions:

1. Upload it to your photo slot (in Your House).
2. Once done, right click on the picture and select properties. Then select the address (URL) of the picture and copy it.

You can paste the URL into your description. You can also paste the actual image into your description. If you would like to do this then click 'Change personal data', scroll down to the description section and write:
<img:Paste the URL you copied earlier here>
Change your personal data and you will see the picture in your description.

To put a picture in a wiki see Wiki guide#Putting pictures in Wiki-pages. Wiki-privs are also explained here.

Note: Deleting pictures from your history-list has no effect on the fact whether or not you also put them in your description or a wiki: those pictures keep existing (this is different for Guards!).

<img:img/drawing/80746_1099411827.jpg>


<img:stuff/uploadfolderofimages.jpg>

Sometimes you want to upload an image in its original size, or upload several images at once. Because the Elftown photo- and drawingslot doesn't allow that, you can use the 'Upload a folder of images' feature.


After pressing the button, you're taken to a new page.
There you fill in a name for a wiki that you want your image to be put on and press continue. The wikipage has to be new and empty.
It asks you to upload a zip-file of your images, or you can press the button below it to upload separate image-files.

Once you're done you can set the options below:
- You can set the wiki to only be editable by you.
- Elftown can add a link to the wiki at the bottom of your house description. Elftown will notify your watchers of a house change.
- You can have the images be placed in separate wikis with an index.
- You can choose to export the wiki.
- You determine the height and width of the image-thumbnails.

Once you press 'Start upload' Elftown will upload your images and design the wiki. All images will be placed in box-tags, so that you can write comments underneath them.
When you're taken to the wiki, you have to press 'Submit changes' to finalise it and create the wiki. Of course you will then be able to continue to edit it to your liking.

<img:img/drawing/80746_1099411827.jpg>


Badges


You may notice that some houses have a section of Elftown Badges. These badges are awarded for many different things, and the text below the badges will tell you what each badge was awarded for. Only select members of the ET crew can give out badges.
See The Badge Reward System to find out how each badge is earned.

<img:img/drawing/80746_1099411827.jpg>


Exporting Your House and Diary


If you want non-Elftown members to be able to see your house and Diary, you need to export them. Only exported pages can be seen if you are not logged in, and can be found on search engines.

<img:knapp/changepersonaldata.gif>
Press the button to edit your house. Then find the option which says "Do you want your presentation and diary to be viewable by non-members?". Click the yes box, then save the changes.

You can also do this through your diary, as explained under [#Diary].

<img:img/drawing/80746_1099411827.jpg>


Member Privileges


Elftown allows users different abilities through the use of member privileges, or privs. (For a general list of privs on Elftown, see Advanced Help) Each priv number within the list grants the member a different ability on Elftown, such as the ability to upload images to wiki-pages, which includes the abilities of all privs of a number higher than their current one.

Only members with priv 89 or below may change a user's priv number, and then only for good reasons. The members who have this power of priv 89 and below are all found within the ranks of the Assembly and Council. Any member can give themselves priv 100, though!

Below is an explanation of the three priv numbers that normal members should be concerned about; that is, the ones they have a chance to receive if they can prove that they need it.

Note: Remember, having a higher priv than someone else does not make you 'better'! After all, no one with a priv higher than 89 can see the value anyway! Only ask for the priv if there is some special use you need it for, and remember, with more privilege comes a higher responsibility to obey the Uploading Art Rules.

priv 100
-This priv can be turned on by any member, by setting "Elftown Crew Wannabe" to Yes in your personal data settings page. When this is turned on, you can see the link in the top navigation bar that will take you to the Tech page.

priv 99
-This priv is granted mainly to people who enter art contests which may require you to submit works of art that are larger than the slots in your house allow. With this priv, a form is added to the bottom of each wiki-page, allowing you to upload an image in any size to Elftown without having to go through your house.
See wiki guide#Putting pictures in Wiki-pages: Wikiprivs.

priv 94
-This priv is granted to the select few people who need to upload some material that is not in an image format to Elftown, such as a personal audio recording, and so forth. Because of the ability this priv gives, it is not handed out often, as very few people really need it.

Lower privs are described further on privs.

<img:img/drawing/80746_1099411827.jpg>


<img:knapp/startwatchhouse.gif>
To watch a house. - At the top of the members house you will find a button that says 'Start watching house'.
Every time this member changes something in the house or makes a public diary-note, you will receive a notification below the right menu.


<img:knapp/stopwatchhouse.gif>
To unwatch a house you scroll down the house again and click 'Stop watching house'.

<img:img/drawing/80746_1099411827.jpg>


Reports


<img:knapp/sendreportoguards1.gif>
To make a report to the Guards - Go to the house of that member. At the top you will find a button that says 'Send report to Guards'. There you can fill in your report about an illegal image that violates the Uploading Art Rules, or if that member is harassing you or your wiki.
See more information on report on how to write a good report.

<img:knapp/sendreportoguards2.gif>
Once you have written your report, select a reporttype and press 'Send this report to the guards'.


Secret comments


<img:knapp/ownsecretcomment1.gif>
To make a private note on a member - Go to the house of that member. Scroll down to the bottom. There you will find a white field with a button that says: 'Create your own secret comment about this house'. Fill in your secret comment and press the button. Secret comments can only be read by you..

Note: Reports and secret comments you made will appear on that members house below the username.
If you were invited to Elftown, Elftown created a secret comment for you on the user who invited you: This will make sure you will be able to find the person who invited you, may there be a chance you have not been told this members name.

To change or remove a comment - Scroll down the house to the white field. Reports and secret comments you made have been stored there. Edit or empty the field and click 'Create your own secret comment about this house'.
- Any report you made can only be really deleted by the Guards. You can only change what you see yourself.


Add this page to your notes
See Navigation#bookmarks.

<img:img/drawing/80746_1099411827.jpg>


<img:stuff/Messaging1.jpg>

<img:knapp/sendmessage.gif>
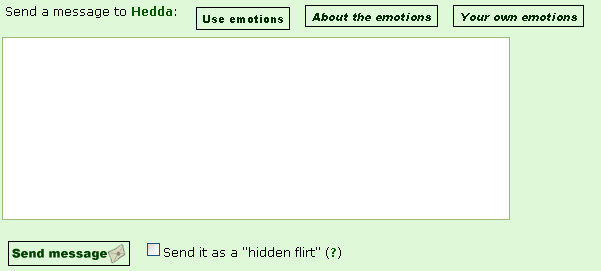
Messaging other members - To message other members you go to their house and scroll all the way down.
There you will see a white field with above it: 'Send a message to [Deleted user]:'.
Write your message and press 'Send message'.


<img:knapp/listmessagesfrommember.gif> <img:knapp/listmessagestomember.gif> <img:sendmestofrom.gif>
Above the message field you see these three buttons:
If you haven't deleted the messages and press either of these buttons, you will see a list of all messages received and/or sent (if any) to/from this member.

<img:img/drawing/80746_1099411827.jpg>


Send it as a "hidden flirt"


A flirt is a secret message you send to a member: they will not receive it until they send a flirt to you. Once they flirt with you, the secret message will turn into a regular message and arrive in the inbox/outbox.
Through this button you can see which of your flirts haven't been responded to yet.

If you send a flirt to someone who has already sent a flirt to you, the flirt by that member will be sent as a message to you. Your flirt will also immediately be sent as a message, with the comment that it is a responded flirt: your flirt is a response to the flirt you now received.

Note: The next flirt will still only be sent if that member flirts with you again too.

How to list your flirts
Go to your notes and press <img:listsentbutunrespontedflirtmessagesaco.gif> there.
This button only shows unresponded flirts. You can't list successful flirts, but you can of course search in your messages.

<img:img/drawing/80746_1099411827.jpg>


<img:schedulemessage.gif>
This button shows you what messages and reminders you have scheduled for yourself.
At the bottom of your house it's possible to send a message to yourself that you want Elftown to message you.
Determine when and how many times it is to be sent and what it should say and press <img:knapp/sendmessage.gif>
It's also possible to create reminders of wikis and forums, with the button <img:createreminder.gif>.
A scheduled message or reminder will appear as a [System message] or [Reminder message] in your inbox.

<img:img/drawing/80746_1099411827.jpg>


Blocking or unblocking a member


<img:knapp/blockmember.gif>

To block a member - To use this feature you go to the member you wish to block. At the top of the house you can click on the button 'Block this member':
<img:stuff/blockthismember.jpg>
Any messages or guestbookmessage from a member you have blocked will not appear in your inbox or guestbook.
After having pressed the button, the button 'You are blocking this member' appears:
<img:stuff/blockingthismember.jpg>

<img:knapp/showblockedmessagestoo.gif>
You can still retrieve messages you were sent by block members. Go to 'View Messages' and click 'Show blocked messages too'.


<img:knapp/removeblocking1.gif>
To unblock a member - To unblock a member you click 'Blocked List': a list appears of members that have been blocked by you (if any). There you can unblock that member again.
<img200*0:stuff/_BlockedList.jpg>

Note: Blocking a member will not stop that member from being able to visit your house!
The both of you will however not have each others username in the last visitorlist anymore.

<img:img/drawing/80746_1099411827.jpg>


About emotions


<img:stuff/emotionbuttons.jpg>

When messaging other members you have to option to add emotions to your text: Emotions are little images expressing certain emotions.
It's also possible to use emotions on wikis and in forums.

'Use emotions'
When clicking this button, you will be shown a lit of public emotions.

'About the emotions'
When clicking this button you will be taken to the wikipage public emotions, where all public emotions are listed.
It's possible to make suggestions there for emotions to be added.

'Your own emotions'
Every member has been given a private page to put own emotions on.
When you click the button you will be taken to this page, where you can put them on.
To add emotions you have to follow the instructions on the page. Once you've put emotions there, they will appear in the 'Use emotions'-list.
You can even add an automatic text-emotion next to it.
The wiki to your own emotions is 'my emotions' followed by your member number: my emotions #
(i.e. [Hedda] is membernumber 1: my emotions 1).

<img:img/drawing/80746_1099411827.jpg>


<img:stuff/lappearance.jpg>

When your username is mentioned below an image on a wiki, the image will show up on the bottom of your house as a 'latest appearance'.
The image will only show up on your house if:
- The wiki is freely editable and exported
- Your username is mentioned after an image that was uploaded through the 'upload folder of images'-feature (the link will have /z/ in it) OR your username is included in the box-tag of the image.

In example:
[#Upload a folder of images]-feature:
<img:stuff/z/membernumber/wikiname/imagename.jpg>
[Hedda]


'Box-tag'-feature:
<box200><img:url>
[Hedda]</box200>

(See Pseudo html#Using the Box tag)

Only members on your relation list are able to see your latest appearances.
When someone makes use of this feature with your username, you will also automatically start watching that wiki.

When you click the link 'Latest appearances in photo albums', you will be taken to a page with all appearances of that member:
'Username was last mentioned in these photo albums'
Above each image there's a button that leads to the wiki with that image.

<img:img/drawing/80746_1099411827.jpg>


<img:headlessminihedda.jpg>

Deleting yourself from Elftown


Have you seen this link on your house? 'Click here to delete yourself from Elftown'

This will take you to a page that says:
'No, you can't delete yourself from Elftown!'
You can only remove all your pictures, clear out your presentation and never log in again.

<img:img/drawing/80746_1099411827.jpg>


[#]


<img:img/drawing/80746_1099411827.jpg>

Go or return to:
- Help
- Elftown Guides
- Navigation
- Wiki guide
- Forum guide

Username (or number or email):

Password:

Show these comments on your site

Elftown - Wiki, forums, community and friendship.